Section divider

Jenkins CI Test Automation Pipeline & Reporting

By Dennis Gurock
12 min read
Jenkins CI Test Automation Pipeline & Reporting

In this guide we will look at setting up a modern CI workflow with Jenkins to run your automated tests and collect & report test results. Running your tests as part of your Jenkins pipeline is a great way to make sure that new changes committed to your project repository are automatically checked and verified.

It doesn't matter whether you are adding your automated tests to your main project pipeline or if you prefer to set up a separate pipeline just for your tests: running your tests with a CI pipeline ensures consistent & regular test execution and enables you to make the test results accessible to your entire team. So let's get started!

Initial Pipeline & Project Repository

For this article we are assuming you have a working Jenkins environment and Git service (we just use GitHub ourselves for this guide). Setting up Jenkins is outside of the scope of this guide and there are many good resources available on how to get started, including the official Jenkins documentation. Usually a good way to get started is to use the official Docker images, as you don't need to install anything yourself then.

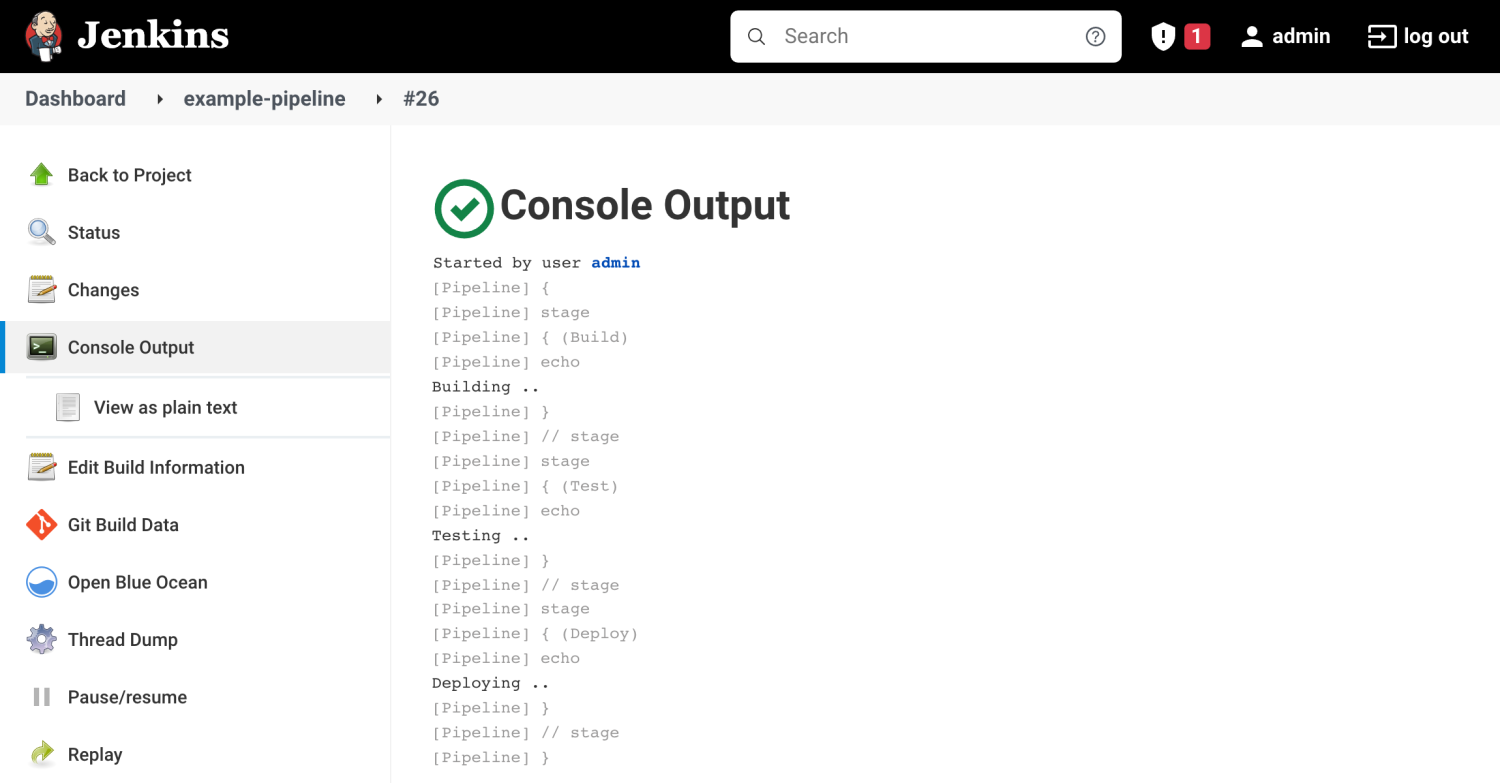
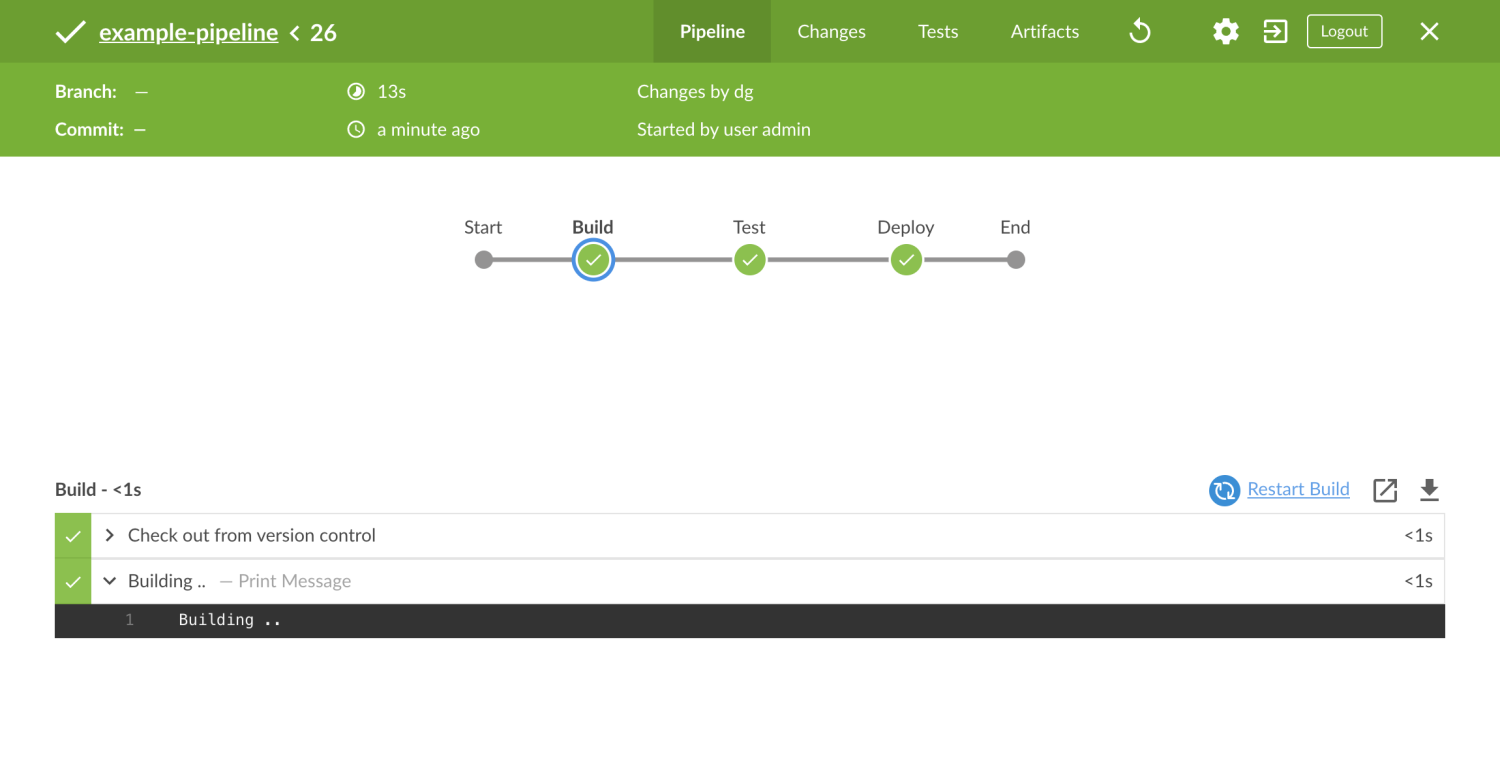
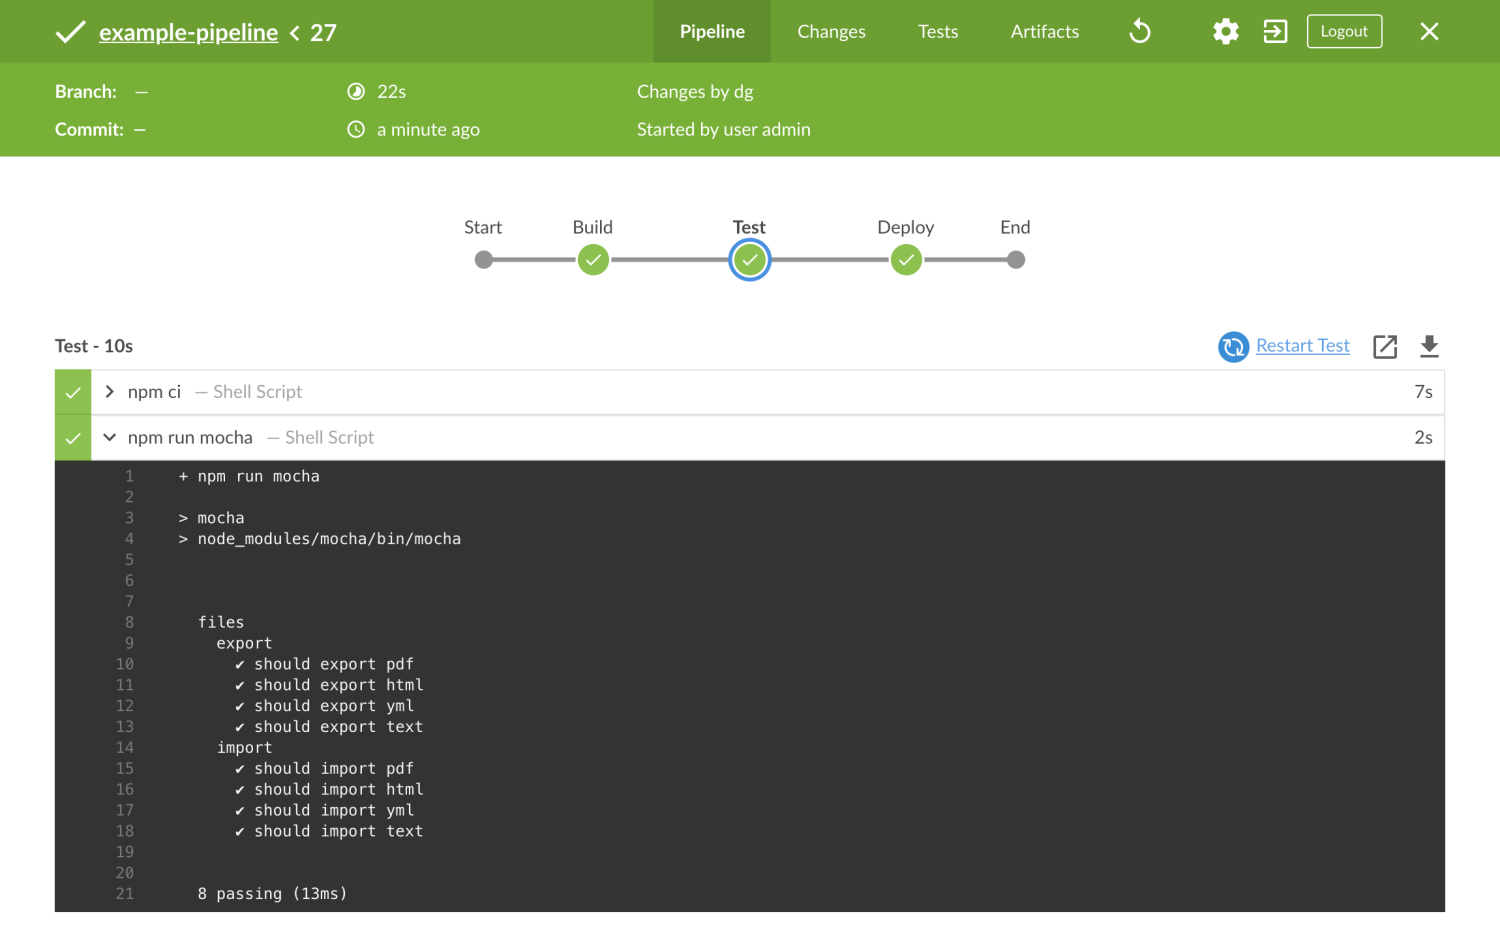
We start by creating a new Git repository called example-jenkins-automation in GitHub and create a new pipeline in Jenkins called example-pipeline (using the Pipeline project type). We also configure the pipeline in Jenkins to connect to our Git repository and automatically retrieve the Jenkins configuration file Jenkinsfile from the repository (learn more).

We have published this project's repository on GitHub so you can always review all files there. Here is the initial Jenkinsfile we start with:

// Jenkinsfile
pipeline {
    agent {
        docker { image 'node' }
    }
    stages {
        stage('Build') {
            steps {
                echo 'Building ..'
            }
        }
        stage('Test') {
            steps {
                echo 'Testing ..'
            }
        }
        stage('Deploy') {
            steps {
                echo 'Deploying ..'
            }
        }
    }
}

Usually you would want to configure the pipeline in Jenkins to automatically start a new run when new code is committed to the Git repository. You can either do this by using a GitHub webhook or you can tell Jenkins to periodically look for changes in the repository. For this example project it's also fine to just launch your pipeline manually from the Jenkins interface with the Build Now action.

Once we add the above file to to our Git repository and hit Build Now, Jenkins will retrieve our Jenkinsfile config from Git and start running the pipeline. We have defined three stages in our file, namely Build, Test and Deploy. Jenkins will execute these stages subsequently and run all steps for each stage. In our example we are just printing a simple message to the console for each stage.

You might also have noticed the agent option in the file. This option tells Jenkins how it should run this pipeline. In our case we are telling Jenkins to run our pipeline inside a Docker container using the official node image (with the Node.js JavaScript runtime, which we will need later). Using Docker is useful as it allows us to use many preconfigured images without having to install anything on our server.

Here's what our initial pipeline run looks like with Jenkins' classic and new UIs:

Running our basic initial pipeline (top: classic Jenkins UI; bottom: new Blue Ocean Jenkins UI)

Start Testing with Testmo Free

#1 Unified Test Management + Jenkins Integration

Test automation runs
Test automation command line

Local Development Environment

To develop and run our tests locally and to use commands to configure our project, it's also a good idea to set up a local development environment. You don't want to commit every small code change to the repository to see if the tests pass. Instead you need a way to run the tests locally during development as well.

You could just develop and run the tests directly on your computer, but we also use a Docker container to do this. This has multiple advantages. First of all we can use the exact same Docker image for local development as we use during the CI pipeline run. This ensures that we use the exact same software packages, versions and environment.

It also makes it much easier to get started, as we don't have to install and set up any packages (except for the Docker runtime). Especially for large projects with many dependencies this is a big benefit. Last but not least it also helps isolate the test code from your main computer, as everything is run inside the container, making it more secure. Let's see how this works!

# dev/docker-compose.yml
version: '3'
services:
  node:
    image: node:19
    volumes:
      - ./../:/project
    working_dir: /project

After setting up Docker on your machine, we can create a new Docker Compose config in our project directory (see above). In our example we will use a simple basic Docker container using the same node image as we use during our CI runs. For more complex projects we could easily add more (side) containers here e.g. for databases, web servers, load balancers and so on.

We can now start the container and launch a shell inside it by using the docker compose command. We are then able to run any command inside the container, fully isolated from our main machine:

$ docker compose run node bash
Creating dev_node_run ... done
root@d433d79213d7:/project$ # in the container

Adding Test Automation

We are now going to set up the test automation suite for our example project. You can use pretty much any testing framework, programming language and platform with Jenkins. For our project we want to use something simple that is easy to configure and we will use a JavaScript (Node.js) based framework, in our case Mocha/Chai. If you are more familiar with another platform such as Python, Java, PHP, .NET, Ruby etc., you can just use a different testing framework and Docker container.

With our node Docker container, everything is already conveniently set up and configured to get started. So we can just use the npm package manager to install our testing framework. So inside our development container we can just install the required Node.js packages:

# Run this inside your container
$ npm install --save-dev mocha chai mocha-junit-reporter

Running this command will download and install the testing framework packages inside our container. NPM will also create new package.json and package-lock.json files that we also commit to our project repository. These files store our project dependencies, so we can easily install these during our pipeline run (and if you work with another team member on this code, they can also easily install the packages then).

We also want to make it more convenient to run our automated tests. So we are going to add a few script aliases to our package.json file, which should now look similar to this (remember that you can always see the full project files in our repository on GitHub):

// package.json
{
  "scripts": {
    "mocha": "npx mocha",
    "mocha-junit": "npx mocha --reporter node_modules/mocha-junit-reporter --reporter-options jenkinsMode=1,outputs=1,mochaFile=results/mocha-test-results.xml"
  },
  "dependencies": {
    "chai": "^4.3.7",
    "mocha": "^10.2.0",
    "mocha-junit-reporter": "^2.2.0"
  }
}

We also need some actual tests for our example project. Our testing framework (Mocha/Chai) makes it easy to create a simple test suite. We just add a new test.js file and add some tests like shown in the following example.

One of the tests we include here has a random chance of 50% to pass or fail. We do this so we can see what both failures and build successes look like in Jenkins.

// test.js
const chai = require('chai');
const assert = chai.assert;

describe('files', function () {
    describe('export', function () {
        it('should export pdf', function () {
            assert.isTrue(true);
        });

        it('should export html', function () {
            assert.isTrue(true);
        });

        it('should export yml', function () {
            assert.isTrue(true);
        });

        it('should export text', function () {
            // Fail in 50% of cases
            if (Math.random() < 0.5) {
                throw new Error('An exception occurred');
            } else {
                assert.isTrue(true);
            }
        });
    });
	
	// [..]
});

We can try and run our tests locally in our development container first. You can just use the script alias we've previously added to our package.json file for this. So to run the tests, simply run npm run mocha inside the container. The output should look similar to this (either passing or failing, based on the random chance we've added):

$ npm run mocha

files
    export
      ✔ should export pdf
      ✔ should export html
      ✔ should export yml
      1) should export text
    import
      ✔ should import pdf
      ✔ should import html
      ✔ should import yml
      ✔ should import text

  7 passing (17ms)
  1 failing

Running the Tests in the Jenkins CI Pipeline

Next we are going to tell Jenkins to run our automated tests inside the CI pipeline. To do this, we update our Jenkinsfile config and adjust our Test stage to run the tests:

// Jenkinsfile
pipeline {
    agent {
        docker { image 'node' }
    }
    stages {
        stage('Build') {
            steps {
                echo 'Building ..'
            }
        }
        stage('Test') {
            steps {
                sh 'npm ci'
                sh 'npm run mocha'
            }
        }
        stage('Deploy') {
            steps {
                echo 'Deploying ..'
            }
        }
    }
}

This is all we need to do to configure and run our test automation suite with Jenkins. Let's look at the details step by step:

  • Startup: Even before Jenkins starts our pipeline, it not only gets the Jenkinsfile config. It also retrieves all the other files from our Git repository, including our test file and package config. All these files are then available inside our pipeline container.
  • npm ci: This command uses the NPM package manager to install all our project dependencies. It basically looks at our package.json (and package-lock.json) files and downloads & installs all listed packages (in our case our Mocha/Chai packages and all other packages they require).
  • npm run mocha: Finally we are running our tests by calling our script alias again. This will launch Mocha, which will execute our tests and output the results to the console. You can then view the console output in Jenkins from the build page.

Just commit the new Jenkinsfile config to the project repository and hit that Build Now button. The output should now look similar to this in Jenkins (using the new Jenkins UI; it looks similar in the classic Jenkins UI):

Reporting Test Automation to Test Management

We now have our pipeline successfully configured to run our automated tests with Jenkins CI. Next we are going to look at submitting and reporting our test results to a test management tool, in our case Testmo.

Reporting the test results helps us track and view all our test results over time, enabling us to make the tests available to all team members, identify slow, flaky and failing tests as well as linking our runs to projects and milestones. We can also more easily report new issues to our issue tracking tool then, such as Jira, GitHub Issues etc. Here's what a test automation run with its results looks like in Testmo:

We can use the testmo command line tool (CLI) to submit our test results to Testmo and this requires only a few changes to our pipeline config. The CLI tool is distributed as an NPM package as well, so we can just use npm to install this tool during our pipeline run (alternative you could install the package in the development container and save it to package.json).

Previously we printed the test results to the console. To send the results to a testing tool, we need the results in a more standard format. Most tools nowadays expect results to be stored in a JUnit XML file, as this has become the de facto standard format. So we change our pipeline to use our previously added mocha-junit script instead, which does exactly this: write the test results to a JUnit XML file instead of printing the results to the console. Not only can we send the results to Testmo now, we can also tell Jenkins about this result file, so the results are also displayed in Jenkins (see our full pipeline example).

We could now just run our Mocha tests to generate the results XML file and then call testmo to upload these results after that. But there's a slightly better way to do this.

Instead, we call testmo and specify the Mocha command as the last argument. This way testmo launches the test suite with Mocha itself. By doing this, testmo can also capture the full console output, measure the test times, record the exit code and submit the results all at the same time.

We also specify a few additional details with the testmo call, such as the name of the test run, the source name, the project in Testmo etc.:

pipeline {

	// [..]

	environment {
        TESTMO_URL = credentials('TESTMO_URL')
        TESTMO_TOKEN = credentials('TESTMO_TOKEN')
    }
    stages {

		// [..]

        stage('Test') {
            steps {
                sh 'npm ci'
                sh 'npm install --no-save @testmo/testmo-cli'
                sh '''
                  npx testmo automation:run:submit \
                    --instance "$TESTMO_URL" \
                    --project-id 1 \
                    --name "Mocha test run" \
                    --source "unit-tests" \
                    --results results/*.xml \
                    -- npm run mocha-junit # Note space after --
                '''
            }
        }

		// [..]
    }
}

Also note the TESTMO_URL variable we reference here, which should provide the address of your Testmo instance. Additionally, testmo expects another variable called TESTMO_TOKEN with the API key for authentication (which you can generate in Testmo from your user profile).

Why not just write these values directly to the Jenkinsfile config? Adding these values here would be a bad idea. You should never commit such secrets to your Git repository, as everyone with (read) access to the repository would then know your access details. Instead, you would use the secret/variable management feature of your CI tool for this. In Jenkins case, we use its credential feature to store these secrets.

In Jenkins, just go to your profile page and select Credentials in the left menu. You can then add and edit any credentials here. We just add new TESTMO_URL and TESTMO_TOKEN credentials (as text types) and enter our URL and API key. We can then reference these credentials and set them as environment variables in our pipeline config (see above).

When we commit the new config to Jenkins and start a build, the testmo command will run the Mocha tests and submit the test results to Testmo. It will also pass through the exit code of Mocha to Jenkins. So if any of our tests fail and Mocha returns a non-zero exit code, testmo will also report this so Jenkins can stop executing further stages of our pipeline (because we don't want our Deploy stage to run if the tests fail!).

Every time we start a new build in Jenkins now, a new test automation run is started and all results are submitted to our testing tool. We can easily track all test results over time now and quickly identify problems with our test suite:

We have now successfully set up our Jenkins pipeline to get our code from Git, run all our automated tests and report the results to our test management tool. This now also enables other team members to keep track of all test automation results, including the entire dev & QA team, even without Jenkins access. Another benefit is that you can also use manual test case management and exploratory testing together with test automation and track everything together in the same projects and milestones.

Jenkins is a popular and often used tool to set up and manage CI pipelines, especially by larger enterprise teams. By following the example outline in this guide, you can now also add your test automation suite to your project pipelines. We also regularly publish additional articles on test automation, test performance, browser automation (e.g. Selenium or WebdriverIO) etc. So if you are interested in these topics, make sure to subscribe to notifications about our upcoming articles.

Start Testing with Testmo Free

#1 Unified Test Management + Jenkins Integration

Test automation runs
Test automation command line

PS: We regularly publish original software testing & QA research, including free guides, reports and news. To receive our next postings, you can subscribe to updates. You can also follow us on Twitter and Linkedin.

Section divider
More from Testmo
Testmo now includes flexible CSV export features for test case repositories, test runs, automation and exploratory test sessions. Generate single exports or many CSV files at once.
Read full article
This guide explains how to set up and run your automated tests as part of a GitHub Actions CI workflow, plus reporting test results to test management.
Read full article
Producing great looking screenshots for software marketing websites can be surprisingly difficult and time consuming. Check out our method to automate this repetitive task with code.
Read full article

Start testing with Testmo for free today

Unified modern test management for your team.