Section divider

GitLab CI/CD Test Automation Pipeline & Reporting

By Dennis Gurock
15 min read
GitLab CI/CD Test Automation Pipeline & Reporting

GitLab CI/CD provides powerful features to run your automated tests whenever a new commit is pushed. In this guide we will look at all the steps to get your first test automation suite running with GitLab and also look at submitting & reporting test results.

It doesn't matter whether you are including your automated tests in your main GitLab project or if you prefer a separate project to host and run just your automated tests: using GitLab CI/CD is a great way to improve your test automation execution.

All you need to follow this guide is some basic understanding of GitLab and Git, so let's go!

Initial GitLab Project and CI/CD Setup

We start with creating a new project in GitLab to host your Git repository. For this guide we are creating a project called example-gitlab-automation but you can adjust the name based on your project. We are also hosting the full project and code repository for this article on GitLab, so you can always review the full working example there. You can also follow this guide if your team is using a private GitLab instance on your own server (instead of GitLab.com as we use in our example here).

We recommend using the git command line tool and getting familiar with it if you haven't used it before. Or you can alternatively edit and add code through GitLab's web interface.

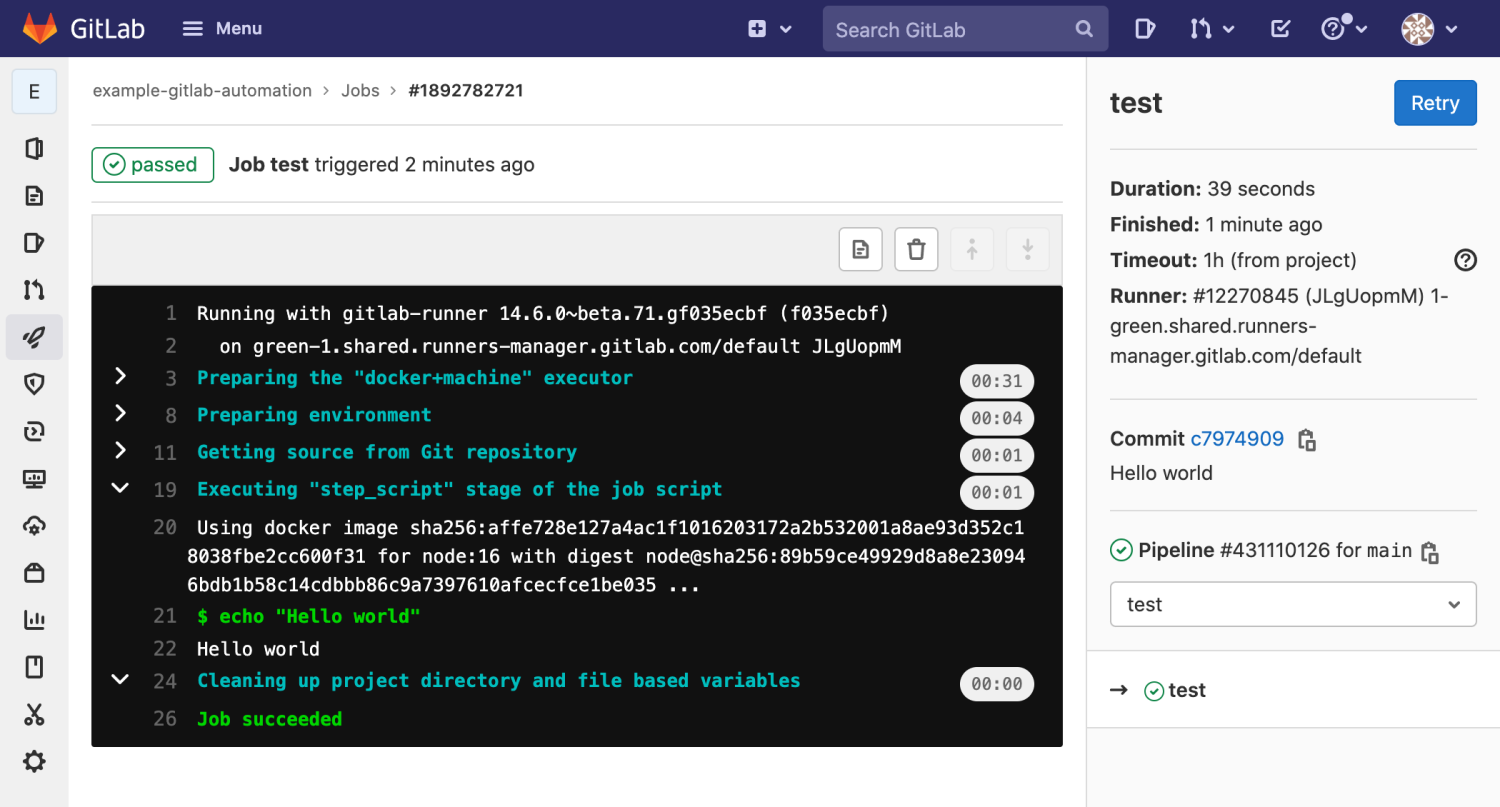
GitLab automatically enables CI/CD pipelines for new projects. It's just a matter of adding a new configuration file called .gitlab-ci.yml to your code repository with instructions for GitLab on what to run. So simply create the following basic workflow in your main repository directory and commit it:

# .gitlab-ci.yml
default:
  image: node:19

stages:
  - test

test:
  stage: test
  script:
    - echo "Hello world"

Let's look at some of the configuration options included in this workflow. We start by defining how GitLab should execute our jobs with its CI runner(s). We do this by setting the image option under the default section. All options we define under the default section automatically apply to all jobs (unless we override the options for individual jobs). In this case we tell GitLab to run our jobs inside a Docker container and use the official node (JavaScript runtime) Docker container. Running your tests with Docker is useful so you can use one of the many available standard Docker images.

Next we define the available stages in our workflow. By default GitLab defines the build, test and deploy stages. GitLab uses stages to decide the order of execution of your jobs. We only really use a single job that runs tests here, so we only define the test stage.

The last section of our file defines our single pipeline job, also called test (any top-level section other than a few reserved names define your workflow jobs). The only thing our job does is to print the string Hello world when executed.

So once you add and commit this file to your repository, GitLab will automatically start a new CI workflow run and execute our test job eventually:

Start Testing with Testmo Free

#1 Unified Test Management + GitLab Integration

Test automation runs
Test automation command line

Local Development Environment

Your CI/CD workflow will run inside a Docker container on GitLab's servers (or on your own servers if your team uses a private GitLab instance). But it's still useful to run code locally, e.g. to see if your tests pass during development or to use the npm package manager to install new packages.

You could do all this directly on your machine, but it's often useful to run code inside a Docker container as well instead. First, it makes it very easy to run any commands and code in the exact same environment: simply use the same Docker container as you use for your CI pipeline. No need to install any prerequisites or dependencies! And second, it makes things more secure as everything runs inside the container without access to your full machine.

We will simply create a new Docker Compose configuration file in our project directory and tell Docker Compose to use the same node Docker container that we already use for our GitLab CI workflow:

# dev/docker-compose.yml
version: '3'
services:
  node:
    image: node:19
    volumes:
      - ./../:/project
    working_dir: /project

We can then easily start our Docker container and run code inside it by using the docker compose command to launch a shell. We can then run any commands and start our tests inside the container without affecting our main machine:

$ docker compose run node bash
Creating dev_node_run ... done
root@d433d79213d7:/project$ # in the container

Setting Up Test Automation

Let's look at our example test automation suite next. You can use pretty much any testing framework, programming language or automation tool with GitLab and the approach we are describing here. For this article we are going to use a simple JavaScript (Node.js) based framework, in our case Mocha/Chai. If your team uses a different programming language such as Ruby, Java, PHP, .NET etc., you would just choose a different framework (and corresponding Docker container).

With the node Docker container we use, everything is already pre-installed and ready to use. So we can just use the npm package manager to install our required packages (i.e. the testing framework we want to use). So inside our development container we will just install these packages:

# Run this inside your container
$ npm install --save-dev mocha chai mocha-junit-reporter

Running this command will download and install the packages and will also create new package.json and package-lock.json files in our project directory with our dependencies (make sure to also commit these files to your repository). When we then check out the code of our repository on another machine or as part of our GitLab CI/CD run in the future, we can easily install all required packages based on these configuration files.

We also want to make it easier to run our automated tests. For this we are adding a few script aliases to the scripts section of the package.json file:

// package.json
{
  "scripts": {
    "mocha": "npx mocha",
    "mocha-junit": "npx mocha --reporter node_modules/mocha-junit-reporter --reporter-options jenkinsMode=1,outputs=1,mochaFile=results/mocha-test-results.xml"
  },
  "dependencies": {
    "chai": "^4.3.7",
    "mocha": "^10.2.0",
    "mocha-junit-reporter": "^2.2.0"
  }
}

We also need an actual test suite for this example project. Mocha/Chai makes it easy to create some simple test cases. Just add a new test.js file and add some tests like shown in the example below. You can also find the full file in this article's GitLab project.

One of the included tests fails with a random chance of 50%. This way you can see and test both full passes and failures in GitLab CI/CD and see how both scenarios work.

// test.js
const chai = require('chai');
const assert = chai.assert;

describe('files', function () {
    describe('export', function () {
        it('should export pdf', function () {
            assert.isTrue(true);
        });

        it('should export html', function () {
            assert.isTrue(true);
        });

        it('should export yml', function () {
            assert.isTrue(true);
        });

        it('should export text', function () {
            // Fail in 50% of cases
            if (Math.random() < 0.5) {
                throw new Error('An exception occurred');
            } else {
                assert.isTrue(true);
            }
        });
    });
	
	// [..]
});

We can first try our tests and run them in our local development container. You can use the script alias we've added above to run the tests; simply run npm run mocha inside the container. The output should look like this (sometimes passing or failing one test if you run the command multiple times):

$ npm run mocha

files
    export
      ✔ should export pdf
      ✔ should export html
      ✔ should export yml
      1) should export text
    import
      ✔ should import pdf
      ✔ should import html
      ✔ should import yml
      ✔ should import text

  7 passing (17ms)
  1 failing

Running the Tests from GitLab CI/CD

We can now also tell GitLab to execute our automated tests as part of the CI pipeline. To do this, we just update our .gitlab-ci.yml file and add the following commands to the script section:

# .gitlab-ci.yml
default:
  image: node:19

stages:
  - test

test:
  stage: test
  script:
    - npm ci
    - npm run mocha

This is all we need to do to set up and run our automated test suite with GitLab. Let's review this step by step:

  • Script start: even before our first command executes, GitLab already retrieves all our code and makes it available inside the container. So when our first command runs in the next step, all our files (including package.json and test.js) are already available.
  • npm ci: This command uses the npm package manager to install all required package dependencies for our project inside the container (ci means clean install here). Another way to put it: we previously installed the mocha and chai packages in our development container. When GitLab runs our CI pipeline, it always starts with an empty container (except our repository files). So we tell npm to look at our package.json file here and install everything we need to run our tests.
  • npm run mocha: Finally we tell GitLab to run our tests. Depending on whether our tests pass or fail, GitLab would continue running additional steps or stop executing further steps if we had any.

So when you commit your new workflow file, GitLab will automatically start a new run for our workflow. It will get the repository code, install our package dependencies and finally run our tests. The output will look something like this (depending on whether the run passes or fails):

Faster CI Execution with Caching

The above CI workflow works great and is a robust way to run our tests. But we can speed it up a little bit by making the installation of our dependencies faster. With the above code, npm would always try to find and download all required packages from the web. GitLab makes it easy to cache such dependencies, so we can directly restore any previous files if our dependencies didn't change between pipeline runs. Especially for larger projects with hundreds of (indirect) dependencies this can make a huge difference.

To use a package cache, we change npm's default setting and use a local .npm directory to store packages. We then tell GitLab to store any files found in this directory at the end of the pipeline run. GitLab then also automatically restores the content at the beginning of future pipeline runs. And if the content of our package-lock.json file changes (e.g. when we install new packages or update versions), GitLab would create a new hash and start a new cache for the updated versions.

# .gitlab-ci.yml

# [..]

test:
  stage: test
  script:
    - npm ci --cache .npm --prefer-offline
    - npm run mocha

  cache:
    - key:
        files:
          - package-lock.json
      paths:
        - .npm/

Automation Reporting to Test Management

We have successfully set up our GitLab CI pipeline to execute our automated tests. We can now also look at submitting and reporting our test results to a test management tool such as our Testmo.

By submitting the test results we can easily track and view all test results, make all tests accessible to the entire team, identify slow, failing or flaky tests and link test runs to milestones. Here's what a test automation run looks like in Testmo:

Sending the test results to Testmo from GitLab only requires a few lines of code in our CI pipeline config. First, instead of using npm run mocha to run our tests, we are changing the call to use our mocha-junit script. This will write our test results to a file using the standard JUnit XML file format instead of outputting the test results to the console. This file format is used and supported by pretty much any test automation tool, so it has become an universal format to exchange test results between tools.

Now to send the test results to Testmo, we use the testmo command line tool. This tool is distributed as an NPM package, so we can just use NPM again to install it (note that even if you do not usually use Node.js and also use a different Docker image, NPM is often pre-installed in most development containers or can be easily added). So we just add the call to npm install to our .gitlab-ci.yml workflow config.

We could now just run our Mocha unit tests to generate the JUnit XML file and call testmo after that to submit the results. But there's a better way to to do this.

Instead, we run testmo (with the automation:run:submit command) and pass the Mocha command as the last parameter. By doing this, our testmo command runs Mocha itself and can then also measure the execution time, capture the console output and record the exit code of Mocha. We also pass a few basic additional details such as the Testmo project ID, test run name, source name and the location of our XML file(s) to testmo:

# .gitlab-ci.yml

# [..]

test:
  stage: test
  script:
    - npm ci --cache .npm --prefer-offline
    - npm install --cache .npm --prefer-offline --no-save @testmo/testmo-cli
    - npx testmo automation:run:submit
        --instance "$TESTMO_URL"
        --project-id 1
        --name "Mocha test run"
        --source "unit-tests"
        --results results/*.xml
        -- npm run mocha-junit # Note space after --

# [..]

You might have noticed that we reference a variable called TESTMO_URL as a placeholder for our Testmo web address in the above config. Additionally, testmo also expects to have an API key available in the TESTMO_TOKEN environment variable for authentication (which you can generate in Testmo from your user profile).

Why not just add the URL and API key directly to our config file here? This would be a very bad idea, as everyone with read access to your GitLab project would then be able to see these secrets in your code. You should never commit API keys and passwords directly to your code repository. Instead, we will use GitLab CI/CD variables to securely store these secrets.

Just go Settings > CI/CD in your GitLab project and add two new variables called TESTMO_URL and TESTMO_TOKEN with the relevant values. Both variables should be configured as Protected and Masked, so they will also be hidden in any console logs. These variables are then automatically available as environment variables during our CI pipeline run.

When we now commit our updated workflow file to GitLab, the testmo command will run the Mocha tests and submit all tests and results to Testmo. It also automatically passes through Mocha's exit code by default. So if any tests fail and Mocha returns an error, testmo also reports the error so GitLab knows to stop the pipeline.

Every time we commit new changes to the repository now, a new test automation run is started and all results are submitted to our testing tool. So we can easily track all results over time and identify potential problems with our test suite:

With our test runs and results in a test management tool now, it also makes it easy for other team members to keep track of the automation results, including the entire dev & QA/testing team. You can also use manual test case management and exploratory testing together with test automation and link everything to the same milestones and projects.

GitLab offers a great way to run your automated tests as part of the CI/CD workflow by following the basic steps explained in this article. GitLab also supports more advanced workflows such as parallel testing jobs for even better performance or running your browser automation suites (e.g. Selenium or WebdriverIO). If you are interested in these topics, make sure to subscribe to notifications about our upcoming articles.

Start Testing with Testmo Free

#1 Unified Test Management + GitLab Integration

Test automation runs
Test automation command line

PS: We regularly publish original software testing & QA research, including free guides, reports and news. To receive our next postings, you can subscribe to updates. You can also follow us on Twitter and Linkedin.

Section divider
More from Testmo
We are adding new search features to repositories, runs and automation. Plus more column customizations, test case editing improvements and more.
Read full article
We are introducing new powerful and customizable print & PDF views for runs, repositories, sessions & automation. Easily export, share & review your tests.
Read full article
Today we are announcing another feature-packed update that introduces various often requested features and productivity improvements to work with tags, test steps, folders & more.
Read full article

Start testing with Testmo for free today

Unified modern test management for your team.