Section divider

Bitbucket CI Pipelines Test Automation & Reporting

By Dennis Gurock
12 min read
Bitbucket CI Pipelines Test Automation & Reporting

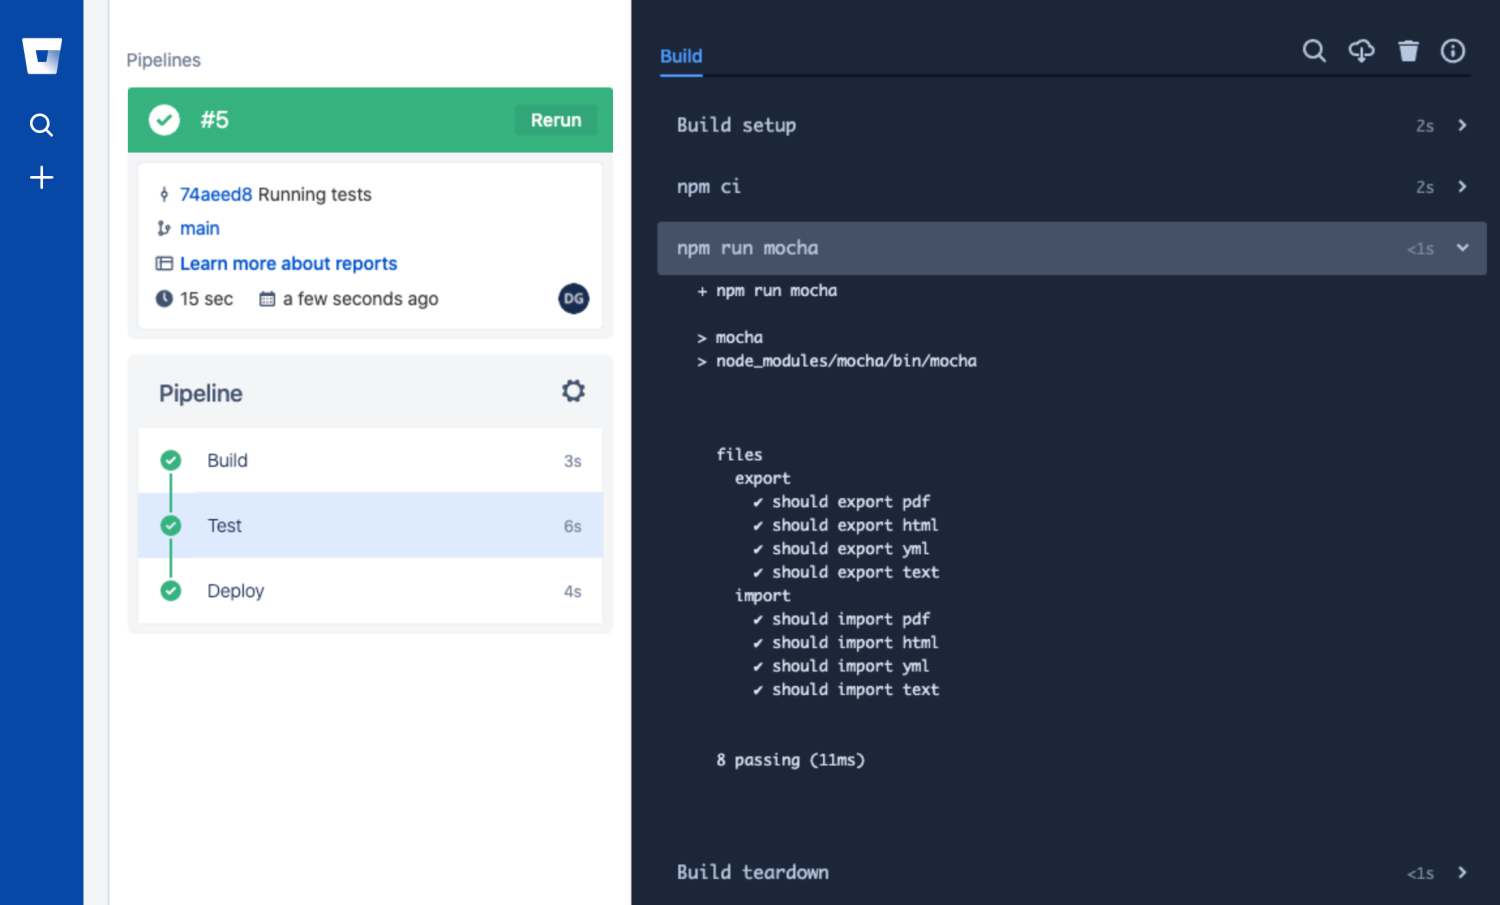
Bitbucket comes with powerful CI pipeline features to automatically build, test and deploy your projects. If you are using Bitbucket, then using the pipeline feature is a great way to test and verify your code and execute your automated tests whenever new code is committed.

It doesn't matter whether you are running your automated tests as part of your main project pipeline, or if you are using a separate project and repository to host and execute just your automated tests: adding your automated tests to your CI pipeline is a great way to ensure that your tests are run consistently & regularly and it enables your entire team to track the results. So let's get started!

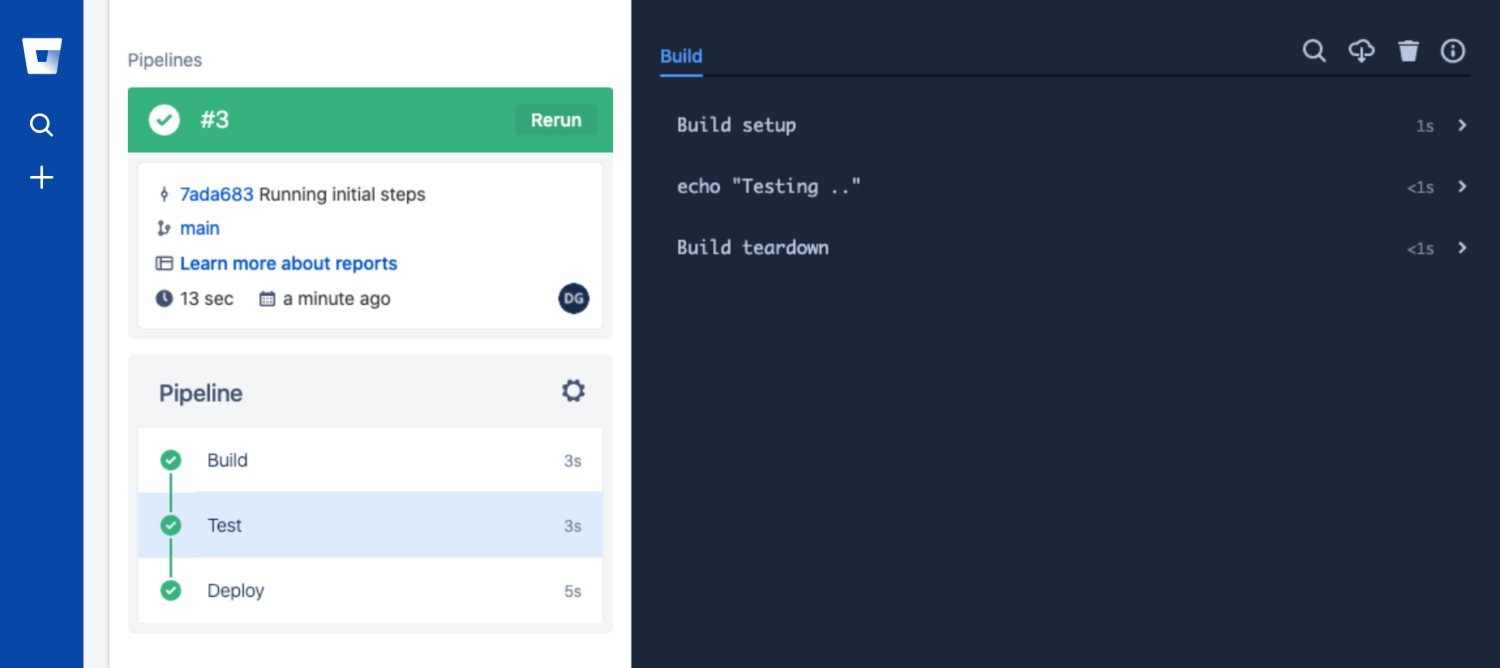
Initial Bitbucket Pipeline & Repository

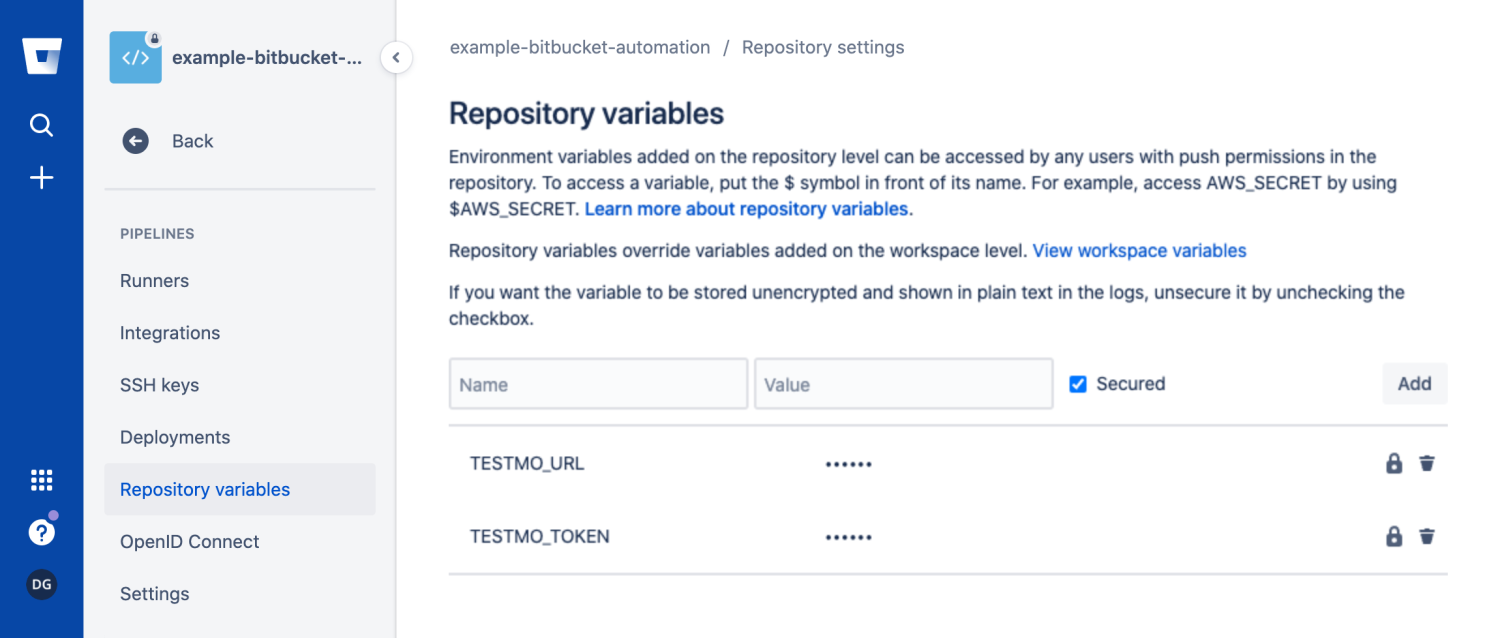
We first create a new repository in Bitbucket to host our code and pipeline for this article. We will call it bitbucket-example-automation, but you can name it anything you like. You can also find the project repository and code for this article on Bitbucket, so you can also review the full code there.

Next we are going to create our initial pipeline configuration. For this, simply add a new file called bitbucket-pipelines.yml in your repository. Bitbucket will always look for a file with this specific filename for the repository's pipeline configuration. Add the following basic pipeline to the file:

# bitbucket-pipelines.yml
image: node:19

pipelines:
  default:
    - step:
        name: Build
        script:
          - echo "Building .."
    - step:
        name: Test
        script:
          - echo "Testing .."
    - step:
        name: Deploy
        script:
          - echo "Deploying .."

After committing this file to your repository, you also need to enable the pipeline feature from the Pipeline page in your repository in Bitbucket. Once it's enabled, Bitbucket will automatically start a new pipeline CI run when you commit new code to the repository.

Let's look at the details of the above basic pipeline configuration. We start by telling Bitbucket how it should run our pipeline by specifying the image option. This tells Bitbucket which Docker image to use. In our case we are going to use the official node Docker image, which hosts the Node.js (JavaScript) runtime, which we will need later in this article.

Next we are going to define a few build steps, namely Build, Test and Deploy. Bitbucket will automatically run the steps sequentially one after another (unless a step fails: Bitbucket would then stop running any remaining steps). Once the configuration is committed to the repository, Bitbucket will run our pipeline eventually:

Start Testing with Testmo Free

#1 Unified Test Management + Bitbucket Integration

Test automation runs
Test automation command line

Developing Locally with Docker

In addition to running your tests and code as part of your Bitbucket pipeline, it's useful to also have a way to run your tests locally on your machine. This way you can just run your tests during development and you don't have to commit every small change to Bitbucket and wait for the pipeline to complete to see the result. You can also use the local development environment to use tools such as npm to install and manage packages for your project.

You could do all this directly on your machine, but it's often better to run your tests and development tools inside a Docker container (just as our CI pipelines also use Docker). This has multiple advantages: first you don't have to install anything on your machine (other than Docker), as all required tools run inside the container. Another benefit is that you can use the exact same Docker image for local development as you use for the pipeline run. So you have the exact same environment. Lastly, running everything inside a container is more secure, as the code will be isolated from your main machine.

To use a local Docker environment for development, we create a new Docker Compose config file in our repository directory. We tell Docker Compose to use the same node image that we also use for the Bibucket pipeline:

# dev/docker-compose.yml
version: '3'
services:
  node:
    image: node:19
    volumes:
      - ./../:/project
    working_dir: /project

We can now start our Docker container and run any commands inside it by using the docker-compose tool and launch a shell. When we run tests or any other command inside the container, it won't affect our main machine now:

$ docker-compose run node bash
Creating dev_node_run ... done
root@d433d79213d7:/project$ # in the container

Adding Automated Testing

We also need a test automation example suite for this project. You can use pretty much any testing framework, programming language or automation tool with Bitbucket. For this article we are using a simple JavaScript (Node.js) based framework, namely Mocha/Chai. If you prefer a different programming language such as Python, Java, Ruby, PHP etc., you would just select a different framework and matching Docker container.

With the node Docker image we are using, everything is already pre-configured to run JavaScript code. We can also use the npm package manager to install our required packages (that is, the Mocha/Chai testing framework). So inside our development container we can just install these packages:

# Run this inside your container
$ npm install --save-dev mocha chai mocha-junit-reporter

NPM will then download and install these packages inside the container. It will also create new package.json and package-lock.json files with our project dependencies (you also need to commit these to the project repository). These files allow us to easily install the same packages during our pipeline run, as well as on other development machines (e.g. if another developer is working on the same project).

We also want to add a few script aliases to make it easier to run our automated tests without having to remember the exact commands. We can also add these aliases to our package.json file like this:

// package.json
{
  "scripts": {
    "mocha": "npx mocha",
    "mocha-junit": "npx mocha --reporter node_modules/mocha-junit-reporter --reporter-options jenkinsMode=1,outputs=1,mochaFile=results/mocha-test-results.xml"
  },
  "devDependencies": {
    "chai": "^4.3.7",
    "mocha": "^10.2.0",
    "mocha-junit-reporter": "^2.2.0"
  }
}

Now we also need actual test cases that we can run for this example project. With Mocha/Chai it's pretty easy to create a simple test suite. We just add a new test.js file to our repository and add some tests as shown in the following example. Remember that you can always find the full code and all files in the article's project repository on Bitbucket.

One of the tests we've added fails with a random chance of 50%. This way you can see what both scenarios look like in Bitbucket, i.e. succeeding and failing pipelines.

// test.js
const chai = require('chai');
const assert = chai.assert;

describe('files', function () {
    describe('export', function () {
        it('should export pdf', function () {
            assert.isTrue(true);
        });

        it('should export html', function () {
            assert.isTrue(true);
        });

        it('should export yml', function () {
            assert.isTrue(true);
        });

        it('should export text', function () {
            // Fail in 50% of cases
            if (Math.random() < 0.5) {
                throw new Error('An exception occurred');
            } else {
                assert.isTrue(true);
            }
        });
    });
	
	// [..]
});

You can now try and run our new tests in the local development environment. You can use the script alias that we have added for this above. Just run npm run mocha inside your development container. The resulting output should look similar to this, depending on whether all tests pass or if our random test fails (just run the command multiple times to see both):

$ npm run mocha

files
    export
      ✔ should export pdf
      ✔ should export html
      ✔ should export yml
      1) should export text
    import
      ✔ should import pdf
      ✔ should import html
      ✔ should import yml
      ✔ should import text

  7 passing (17ms)
  1 failing

Running the Tests with Bitbucket Pipeline

Next we can also tell Bitbucket to run our automated tests as part of the pipeline CI run. To do this, we change our Test step in our bitbucket-pipelines.yml config to run the tests:

# bitbucket-pipelines.yml
image: node:19

pipelines:
  default:
    - step:
        name: Build
        script:
          - echo "Building .."

    - step:
        name: Test
        script:
          - npm ci
          - npm run mocha

    - step:
        name: Deploy
        script:
          - echo "Deploying .."

Adding the two lines to the Test step is all we need to run our automated tests with Bitbucket. Let's review this step by step:

  • Startup: Even before our commands are run, Bitbucket starts the container specified in our pipeline config and retrieves the repository code. So when our commands are executed, all our repository files are already available, including test.js and package.json).
  • npm ci: We use the NPM package manager first to install all our project dependencies. NPM will basically look at our package.json (and package-lock.json) file to find all required packages (the ci command here means clean install). It will then automatically download our mocha and chai packages, as well as any additional dependencies these packages have.
  • npm run mocha: We finally tell Bitbucket to run our tests, just like we did in our local development container. Depending on whether our tests pass or fail (remember that we added one test that fails with a random chance of 50%), Bitbucket will continue with running our Deploy step, or it will stop execution of the pipeline.

So when we commit the new config to Bitbucket, it will start a new pipeline run for our new workflow. Bitbucket will start with retrieving our repository files, then install our package dependencies and finally run our tests. The output will look something like this in Bitbucket then:

Faster Bitbucket Pipelines with Caching

The above CI pipeline configuration works well and is a robust way to run our tests. But we can also make things a little bit faster and speed up the installation of our dependencies. Currently, NPM would always try to detect and download all dependency packages from the web. We can cache these packages with Bitbucket so we can download and access these packages faster. Especially for large projects with many project dependencies this can make a huge difference.

Bitbucket comes with a sample 'node' cache option. But it uses an outdated recommendation for caching packages (directly storing the node_modules directory). We use a better option for this and cache NPM's own cache instead. We just tell Bitbucket to cache any files located in the ~/.npm directory. We then specify the caches option for our Test step to apply the cache to this step:

# bitbucket-pipelines.yml
image: node:19

pipelines:
  default:
	# [..]

    - step:
        name: Test
        caches:
          - npm
        script:
          - npm ci
          - npm run mocha

	# [..]

definitions:
  caches:
    npm: ~/.npm

Reporting Test Results to Test Management

We have configured our Bitbucket CI pipeline to successfully run our automated tests now. Next we can also submit and report our test results to a test management tool, in our case Testmo.

By sending the test results to our testing tool, we can easily track and view all test results over time, make the results accessible to the entire team, identify problematic tests (e.g. slow or flaky tests) and link runs to milestones. We can also quickly create new Jira issues for problems we found with our automated tests and benefit from a full Jira test management workflow.

Here's what a test automation run looks like in Testmo, listing automated tests, its hierarchy and result status, along with the console output and testing times:

Testmo make it easy to submit automated test results from CI pipelines. First, instead of using our previous npm run mocha command, we are changing the call to use the mocha-junit script we added to our package.json file above. This will tell Mocha to write the test results to a file using the standard JUnit XML file format instead of writing the results to the console. This format is used and supported by pretty much any test automation tool (or can convert to it), so it has become the de facto standard to exchange test results between tools.

Now to submit the test results, we use the testmo command line tool for this. This tool is also distributed as an NPM package, so we can just use NPM to install it (even if your project doesn't use Node.js/JavaScript, NPM is usually still pre-installed in many environments or can be easily added). So we just install the package using npm install as part of our pipeline configuration.

We could just run our Mocha tests to generate the JUnit XML file and call testmo after this to submit the results. But there's a slightly better way.

Instead, we run testmo (with its automation:run:submit command) and pass the Mocha command as the last argument. This way, the testmo tool launches our Mocha test run itself. It can then additionally measure the execution time, capture the console output and record the exit code of Mocha. We also specify a few additional arguments here, such as the test run name, project ID and source name:

# bitbucket-pipelines.yml
image: node:19

pipelines:
  default:
	# [..]

    - step:
        name: Test
        caches:
          - npm
        script:
          - npm ci
          - npm install --no-save @testmo/testmo-cli
          - npx testmo automation:run:submit
              --instance "$TESTMO_URL"
              --project-id 1
              --name "Mocha test run"
              --source "unit-tests"
              --results results/*.xml
              -- npm run mocha-junit # Note space after --

	# [..]

definitions:
  caches:
    npm: ~/.npm

You might have noticed that we specify the address of our Testmo instance with the TESTMO_URL variable. The Testmo command line tool also expects the required API key (for authentication) to be available in the TESTMO_TOKEN environment variable (you can generate the API key in Testmo from your user profile).

Note that we specifically did not include these values directly in the pipeline configuration. This would be a bad idea, as this would allow anyone with just read access to the code to see these secrets. You should never commit and store such keys and secrets directly in your code. Instead, all major CI tools provide features to store these variables and secrets separately.

In Bitbucket, simply go to the repository settings and select Pipelines > Repository variables. You can then add new variables called TESTMO_URL and TESTMO_TOKEN with the relevant values (both variables should be configured as Secured). Bitbucket will make these variables automatically available in our pipeline script as environment variables.

After you commit the new pipeline configuration to Bitbucket, the testmo command will run the Mocha tests and submit the tests with their results to Testmo. It will also automatically pass through the exit code from Mocha to Bitbucket. So if the tests fail and Mocha returns an error, testmo will report this error to Bitbucket so it stops executing further pipeline steps.

Now every time you commit new code to Bitbucket, a new test automation run is started and all results are submitted to the testing tool. We can easily track all test runs over time now and identify problems with our test suite:

Now that we have all our test runs and results in our test management tool, it also enables other team members to access all of our test automation results, including the entire QA and dev teams. Testmo also supports working with manual test case management and exploratory testing, so everything can be tracked together in the same milestones and projects.

Bitbucket is a popular code repository and CI tool to automate build, test and deploy pipelines. Bitbucket also supports more advanced CI workflows, such as running your automated tests with parallel testing jobs or to run your browser automation suites (such as Selenium or WebdriverIO). If you are interested in such advanced workflows as well, make sure to subscribe to notifications about our upcoming articles covering these topics.

Start Testing with Testmo Free

#1 Unified Test Management + Bitbucket Integration

Test automation runs
Test automation command line

PS: We regularly publish original software testing & QA research, including free guides, reports and news. To receive our next postings, you can subscribe to updates. You can also follow us on Twitter and Linkedin.

Section divider
More from Testmo
We are releasing various enhancements such as bulk issue editing, improvements to our Jira add-on, better issue reports, as well as various other enhancements.
Read full article
Complete guide to Sauce Labs reporting of test results, metrics and dashboards for your browser tests with Testmo, including full CI pipeline integration example.
Read full article
Learn about running your automated tests as part of your Jenkins CI pipeline and how to report your test results to test management.
Read full article

Start testing with Testmo for free today

Unified modern test management for your team.