Section divider

CircleCI Test Automation CI Pipeline with Docker & Reporting

By Dennis Gurock
12 min read
CircleCI Test Automation CI Pipeline with Docker & Reporting

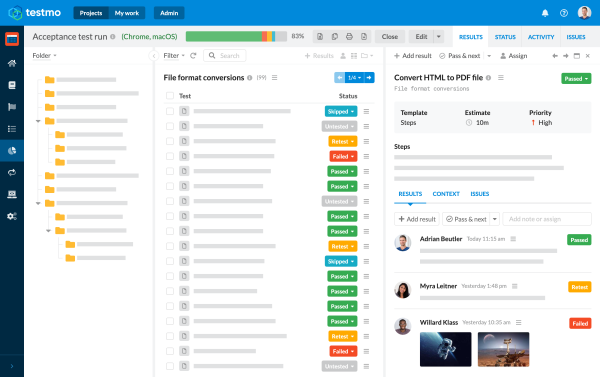
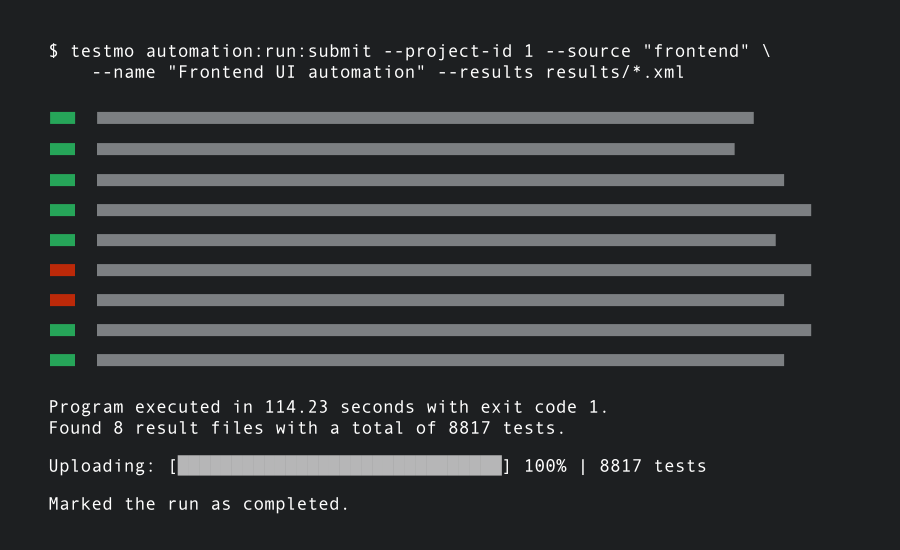
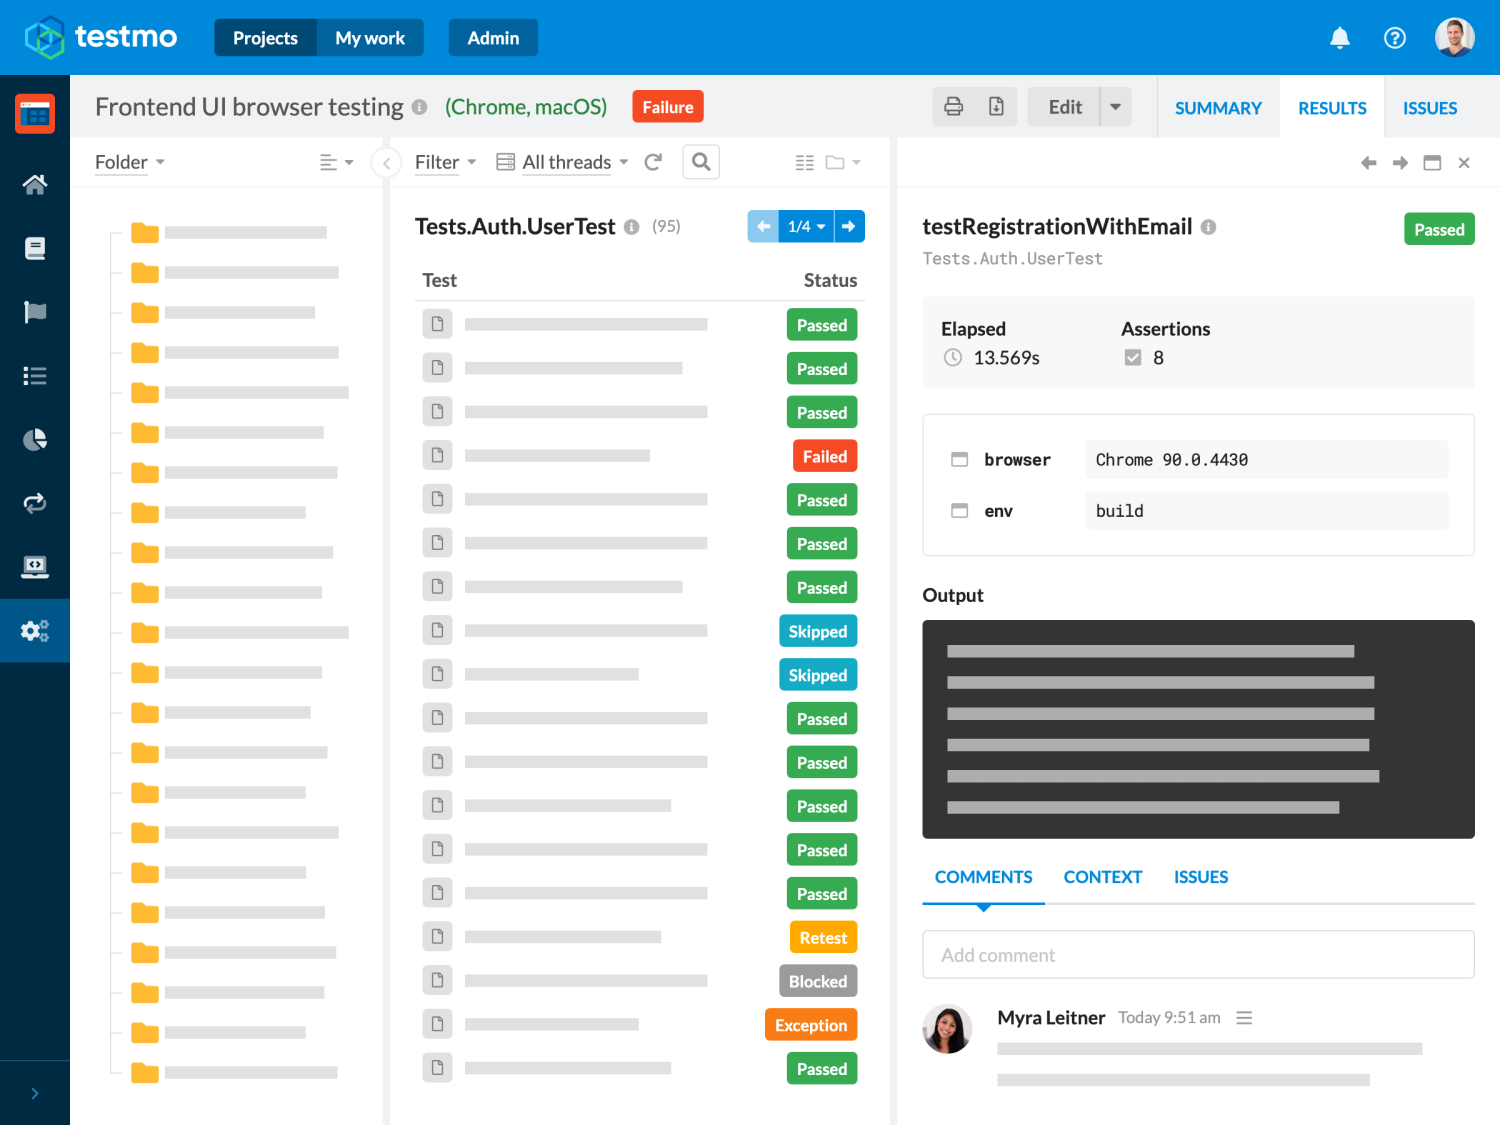
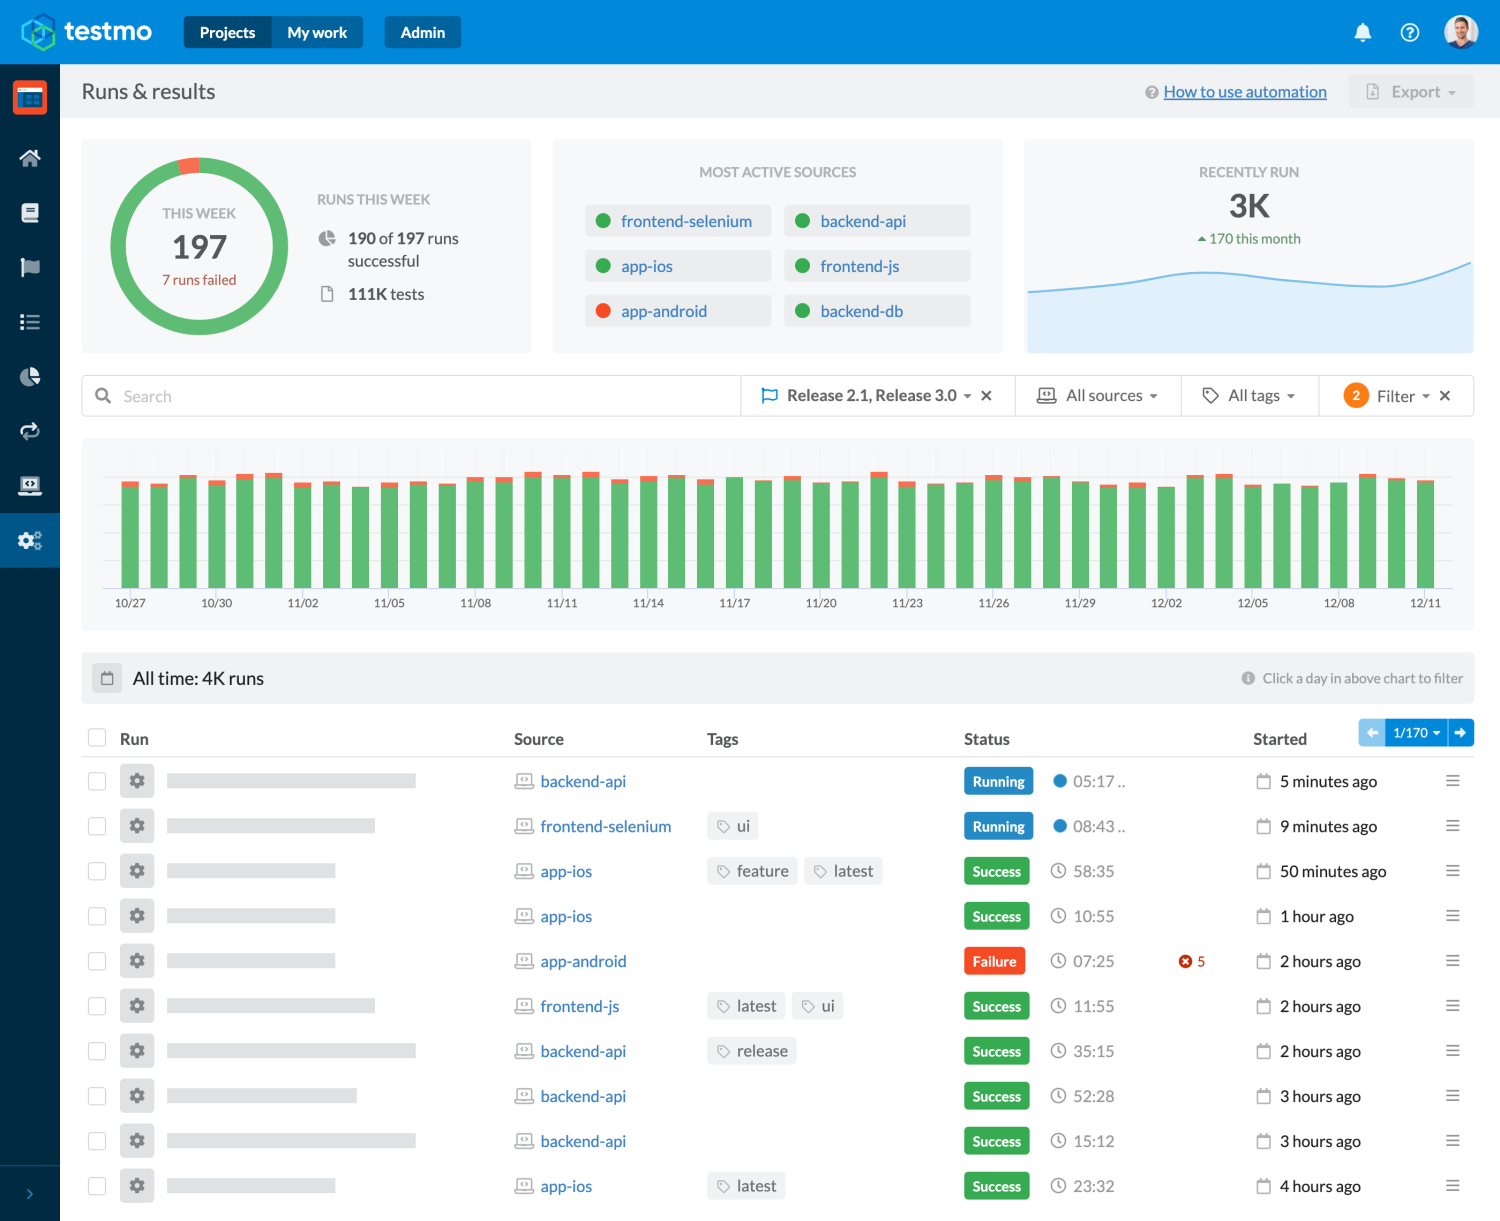
In this article we will look at setting up a modern CI workflow to run automated tests on CircleCI with Docker, including collecting and reporting test results. The setup explained here will work with practically any test automation tool, so you can easily adjust it to the frameworks and platforms you use.

Initial Git Repository & CI Config

We will start by creating a new Git repository on GitHub. If you are new to Git or GitHub, simply follow these instructions. We recommend getting familiar with and using the git command line tool if you don't use it already. For this article we are creating a repository called example-circleci-automation, but you can name it anything you like. We've also published this article's Git repository so you can always review the full files there.

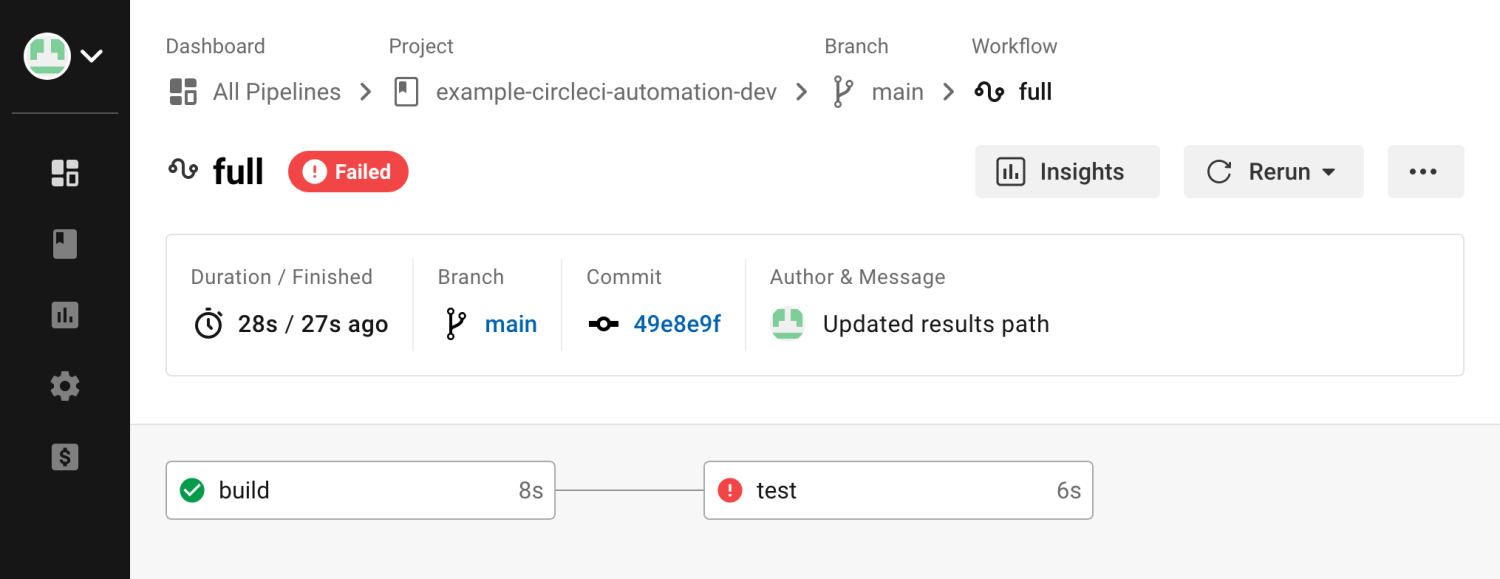
Next you will need to create a CircleCI account and link it to this new repository (in CircleCI, they call this following the project). The idea is that whenever you push a new version of your code to GitHub, CircleCI automatically starts a new CI build for projects you follow.

To start, we will just add a single file to our repository: the main CircleCI config file under .circleci/config.yml.

# .circleci/config.yml
version: 2.1

jobs:
  build:
    docker:
      - image: cimg/node:current
    steps:
      - checkout
      - run: node --version

All your CI jobs and workflows for this repository are configured in this file. For our initial configuration we tell CircleCI to check out our repository files and run node --version to display the Node.js version.

CircleCI also needs to know in which environment to run these commands. CircleCI supports different executors, such as running your jobs in a specific virtual machine. In our example we tell CircleCI to use a Docker image instead. This is faster than starting a new virtual machine for each run and there are countless of pre-built Docker images we can choose from.

We will just use an image directly from CircleCI optimized to run JavaScript with Node.js for this project, called cimg/node. Once you add the file and push it to GitHub, CircleCI should run your workflow and display the single build job like this:

Start Testing with Testmo Free

#1 Unified Test Management + CircleCI Integration

Test automation runs
Test automation command line

Local Dev Environment

It's very useful to have a local development environment that is similar to the system running your CI workflow. Not only does it make it easier to try commands and configure tools locally before adding them to your CI jobs. It also makes it much easier and more secure to run third-party software, especially if your project has many (development) dependencies.

Fortunately this is very easy with Docker. You can just reuse the same or similar Docker containers for local development that you use and execute as part of your CI workflow. This way you run the exact same software, versions and configurations as you use during your builds and tests, all without installing anything on your dev machine.

In fact, you don't need to install anything on your dev machine other than Git, Docker and a text editor. Even if you need hundreds of packages and tools to build and run your software. Let's take a look at how this works!

# dev/docker-compose.yml
version: '3'
services:
  cimg-node:
    image: cimg/node:current
    volumes:
      - ./../:/project
    working_dir: /project

We use Docker Compose to configure local containers similar to the containers used for our CI workflow. In our simple example we will just use a single container using the CircleCI node image cimg-node. But with a more complex project we could easily be running additional services such as databases, web servers and more. All just by using the same images and containers used for the build or production environment.

Once you've added the docker-compose.yml file to your project, you can simply launch a shell inside the container and execute any command and start your tests locally. Just use the docker compose command that comes with Docker. All the following commands used in this article will run inside our container:

$ docker compose run cimg-node bash
Creating dev_cimg-node_run ... done
circleci@23841f9bdcdb:/project$ # in the container

Test Automation Example Project

You can use pretty much any test automation tool and framework with the approach described in this article. There are pre-configured Docker containers for most platforms to make it easier to get started, either provided by CircleCI or built by tool vendors. Many of these images also have additional variants with more features. For example, there are versions of the CircleCI images that include browsers pre-installed; perfect if you want to run tests end-to-end tests e.g. with Selenium.

For this article we will choose a simple JavaScript framework to demonstrate testing during CI. We will use Mocha/Chai to run and assert tests. But you can use any other language or tool as well, including Ruby, Python, PHP, Java, .NET etc. To get started with Mocha/Chai, we will install the necessary packages with the npm package manager (remember to run this inside your container):

# Run this inside your container
$ npm install --save-dev mocha chai mocha-junit-reporter

This will automatically create a package.json file with our new dependencies. To make it easier to start our Mocha test runs from the command line and from our CI jobs, we will also add two script aliases to our package file:

// package.json
{
  "scripts": {
    "mocha": "npx mocha",
    "mocha-junit": "npx mocha --reporter node_modules/mocha-junit-reporter --reporter-options jenkinsMode=1,outputs=1,mochaFile=results/mocha-test-results.xml"
  },
  "devDependencies": {
    "chai": "^4.3.7",
    "mocha": "^10.2.0",
    "mocha-junit-reporter": "^2.2.0"
  }
}

Next we are going to create a simple test suite with a couple of test cases. Most of the tests will simply pass, but we are also adding an error so we can see how the failure is reported during the build. Simply create a test.js file in your project directory and add tests. Remember that you can also look at this article's Git repository to see the full example file.

// test.js
const chai = require('chai');
const assert = chai.assert;

describe('files', function () {
    describe('export', function () {
        it('should export pdf', async function () {
            assert.isTrue(true);
        });

        it('should export html', async function () {
            assert.isTrue(true);
        });

        it('should export yml', async function () {
            assert.isTrue(true);
        });

        it('should export text', async function () {
            throw new Error('An exception occurred');
        });
    });

    // [..]
});

Now running your tests inside our development container is very easy, as it includes everything we need for Node.js pre-installed. Simply run npm run mocha from inside the container. This will use the alias we've added to the package config and run our tests. You can see the passed tests as well as the failed test we added:

$ npm run mocha

files
    export
      ✔ should export pdf
      ✔ should export html
      ✔ should export yml
      1) should export text
    import
      ✔ should import pdf
      ✔ should import html
      ✔ should import yml
      ✔ should import text

  7 passing (17ms)
  1 failing

Running Automated Tests on CircleCI

Next we are going to update our CircleCI config to run our tests during the CI workflow. Strictly speaking we would just need to have a single CI job, e.g. test, as our project only consists of a test suite. Most projects aren't this simple though. So we will separate our CI workflow into build and test jobs so we have a more complete example.

During our build job we are going to check out our code, install all required Node.js packages (e.g. Mocha) and then store the packages for the next CI job. We are also making use of CircleCI's cache so we don't have to download and install all packages every time we run our CI workflow. Once your projects become bigger, it can take a lot of time to install all project dependencies every time. So it's a good idea to add caching from the beginning.

# .circleci/config.yml
version: 2.1

jobs:
  build:
    docker:
      - image: cimg/node:current
    steps:
      - checkout

      # Restore previous node package cache if there is one
      - restore_cache:
          key: node-{{ checksum "package-lock.json" }}

      # Install or update packages
      - run: npm ci

      # Save cache
      - save_cache:
          key: node-{{ checksum "package-lock.json" }}
          paths:
            - ~/.npm

      # Store project files for the next job
      - persist_to_workspace:
          root: ~/
          paths:
            - project

For the next CI job, test in our case, we are restoring the files of the previous build job and then run our Mocha test suite. This time we are using our second alias mocha-junit, which writes the test results to JUnit XML files instead of outputting the results to the console. This will allow us to report the results to CircleCI and our test management tool. Pretty much any test automation tool can output or convert test results to JUnit XML files, so this has become the de-facto standard to exchange test results between tools.

After running our tests we are storing the result files (artifacts) so we can view and download them from CircleCI's interface later. And we are also submitting the test results to CircleCI to see some test statistics on the build page.

Last but not least we are telling CircleCI that the test job should run after the build job by adding it as a requirement. test will only run if the build job succeeded without errors.

# .circleci/config.yml

# [..]

  test:
    docker:
      - image: cimg/node:current

    steps:
      # Start with the initial build
      - attach_workspace:
          at: ~/

      # Run tests and save JUnit XML file
      - run: npm run mocha-junit

      # Store test artifacts and results
      - store_artifacts:
          path: results
          destination: test_results
      - store_test_results:
          path: results

workflows:
  version: 2
  full:
    jobs:
      - build
      - test:
          requires:
            - build

When you push the new config to GitHub and thus start a new workflow run in CircleCI, we can see the two jobs in CircleCI's web app. The first build job prepared the required packages and succeeded, and then test failed. This is because we have a failing test in our test suite. Mocha returns with an error code, signaling to CircleCI that the test run failed. CircleCI would then stop executing any further jobs by default, thus preventing a failing build to be deployed, for example.

Reporting Results to Test Management

Now that we have run our test suite and have test results in an universal file format (JUnit XML files), we can also submit our results to a test management tool such as our Testmo.

Testmo makes it easy to track your test suites over time, report and archive test results, identify slow or flaky tests and make your automated tests more accessible to your entire team. Testmo also comes with full test case management and exploratory testing, allowing for unified QA management in a single tool. This is what automated tests look like in Testmo:

Reporting test results from CircleCI is very easy. We can just extend our test job with the required code. First we install the testmo command line tool. As this is deployed as a simple npm package, this requires just a single line of code.

Next we are going to submit our test results. We could just leave our mocha-junit script in place as-is and upload our JUnit files after the test suite has run. But there's a better way.

Instead we are going to call the testmo command and pass the test run command as the last parameter. This has the added benefit of allowing Testmo to automatically collect any console output from our tests as well as measuring the execution time.

Additionally we are specifying a few basic things such as the project, name and source of our new run in Testmo, as well as the location of the result files we want to submit. We could also include many more details here such as a link back to CircleCI or the GitHub version hash.

# .circleci/config.yml

# [..]

  test:
	  # [..]

      # Install Testmo CLI tool
      - run: npm install --no-save @testmo/testmo-cli

      # Run tests and report results to Testmo
      - run:
          command: |
            npx testmo automation:run:submit \
              --instance "$TESTMO_URL" \
              --project-id 1 \
              --name "Mocha test run" \
              --source "unit-tests" \
              --results results/*.xml \
              -- npm run mocha-junit # Note space after --
# [..]

workflows:
  version: 2
  full:
    jobs:
      - build
      - test:
          requires:
            - build
          context:
            - testmo

The test job also needs a few environment variables to be configured in CircleCI. You might have noticed that we use a TESTMO_URL variable in the code as a placeholder. The testmo command also expects an API key to be available in the TESTMO_TOKEN environment variable (which you can generate in Testmo from your user profile).

Why not just add these details directly to the config.yml? It's a very bad idea to specify such secrets directly in the config file, as these would be stored in your Git repository for everyone to see then.

Instead CircleCI provides contexts where you can securely store secrets such as passwords or API keys outside of your code. When you add a context to your config.yml file's workflows section (see above), any secret configured for this context in your CircleCI organization settings are automatically made available as environment variables then.

With everything in place now, when you push the new code to GitHub, our CI workflow starts the build, then runs the tests and finally submits all test results to Testmo. The testmo command also automatically passes through the exit code of the Mocha run. So your workflow will also fail (because of the failed test we have in our test suite). And the results are still submitted to Testmo.

For every code push and test suite run, a new test run is added to Testmo with all your test results, so you can quickly see the full test history, trends, problematic test cases and timings.

That's it! We have a full test automation example running on CircleCI with Docker now, including full test result reporting. The example CircleCI and test automation workflow explained in this article is also a good starting point for more complex test suites and CI steps. If you are interested in running Selenium and front-end browser tests as part of your CI workflow, or want to learn about more advanced workflows featuring parallel test execution, make sure to subscribe to our upcoming postings

Also feel free to take a look at Testmo if you are interested in trying a test management tool for your project, or let your QA testing team know.

Start Testing with Testmo Free

#1 Unified Test Management + CircleCI Integration

Test automation runs
Test automation command line

PS: We regularly publish original software testing & QA research, including free guides, reports and news. To receive our next postings, you can subscribe to updates. You can also follow us on Twitter and Linkedin.

Section divider
More from Testmo
Our original guide to writing test cases. Improve your test cases and test case design by learning from our examples, test case templates and best practices
Read full article
Running automated tests in parallel CircleCI jobs is a great way to improve your CI pipeline performance. This guide explains how to add concurrency to your CircleCI testing jobs step by step.
Read full article
We are excited to announce Testmo, our new modern test management tool for software teams. Today we are sharing the first details of the unified QA & testing platform we have been working on.
Read full article

Start testing with Testmo for free today

Unified modern test management for your team.