Section divider

Bitbucket CI Parallel Test Automation Pipelines

By Dennis Gurock
15 min read
Bitbucket CI Parallel Test Automation Pipelines

Bitbucket CI pipelines support parallel test automation jobs, which is a great way to improve build times and to provide faster feedback with test results to your dev & QA team. It can be frustrating for developers having to wait a long time for tests to complete when new code is pushed. Not only does running your tests in parallel reduces wait time, it also allows you to deploy bug fixes and updates to production faster without limiting the number of tests you can run.

If you haven't set up test automation with Bitbucket before, we also have an introductory article on Bitbucket CI test automation pipelines, which is a good way to get familiar with the basic concepts.

Executing your automated tests in parallel jobs in Bitbucket is quite straightforward and you just need to learn a few concepts and configuration options. In this guide we will go through all the details to get this up and running, as well as reporting our test results to test management. Let's get started!

Bitbucket Pipelines Parallel Testing Workflow

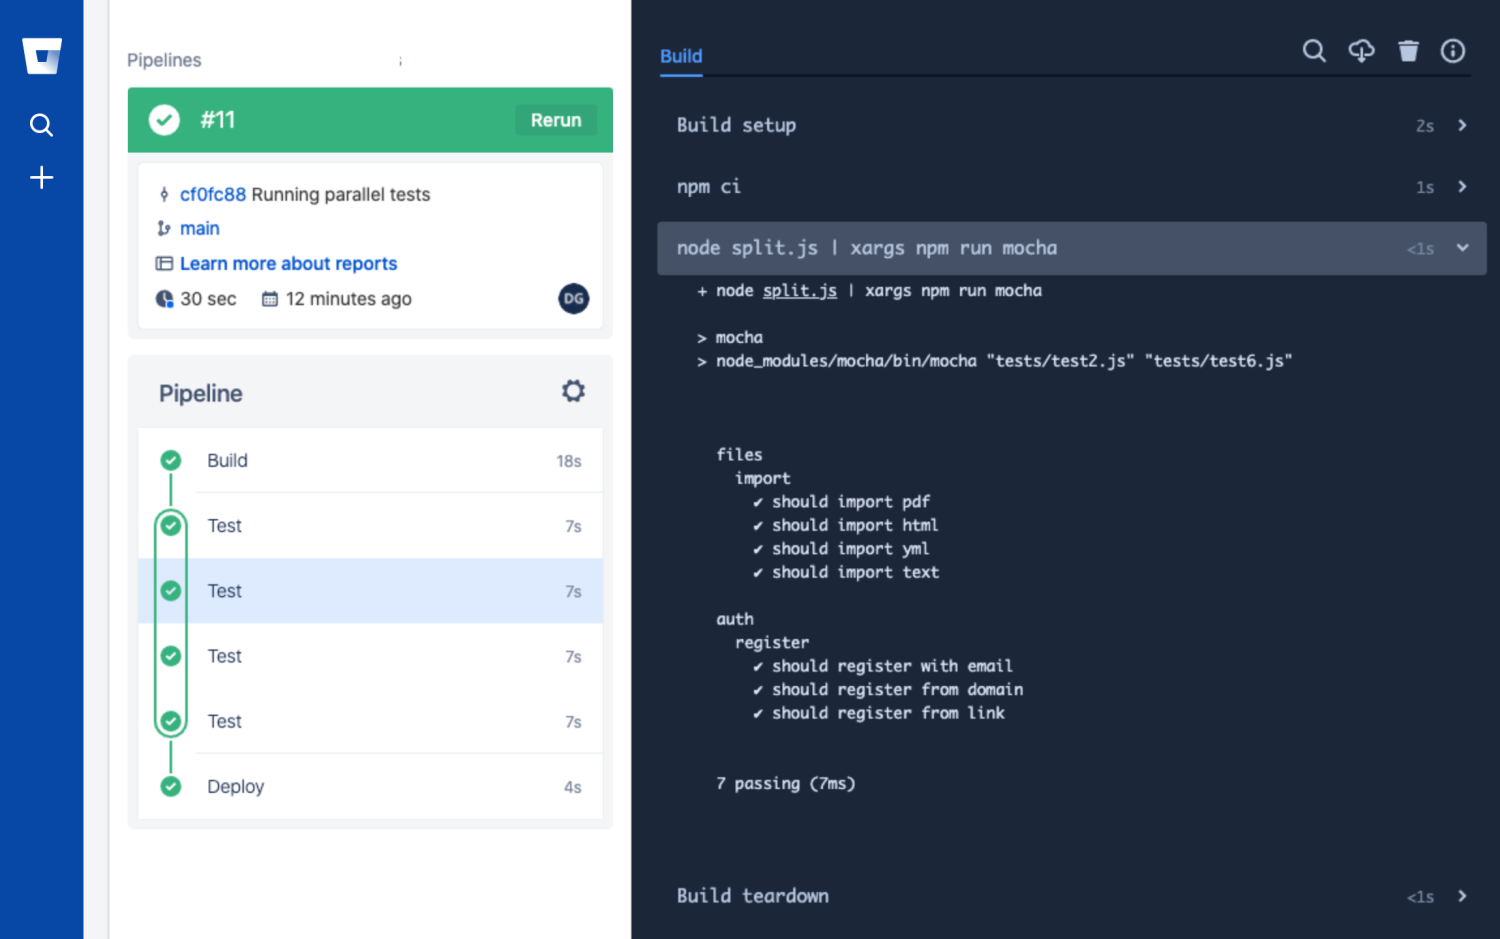
To run our automated tests in parallel, we need to tell Bitbucket to start multiple parallel test jobs at the same time. In each testing job we then run a subset of our automated tests to verify.

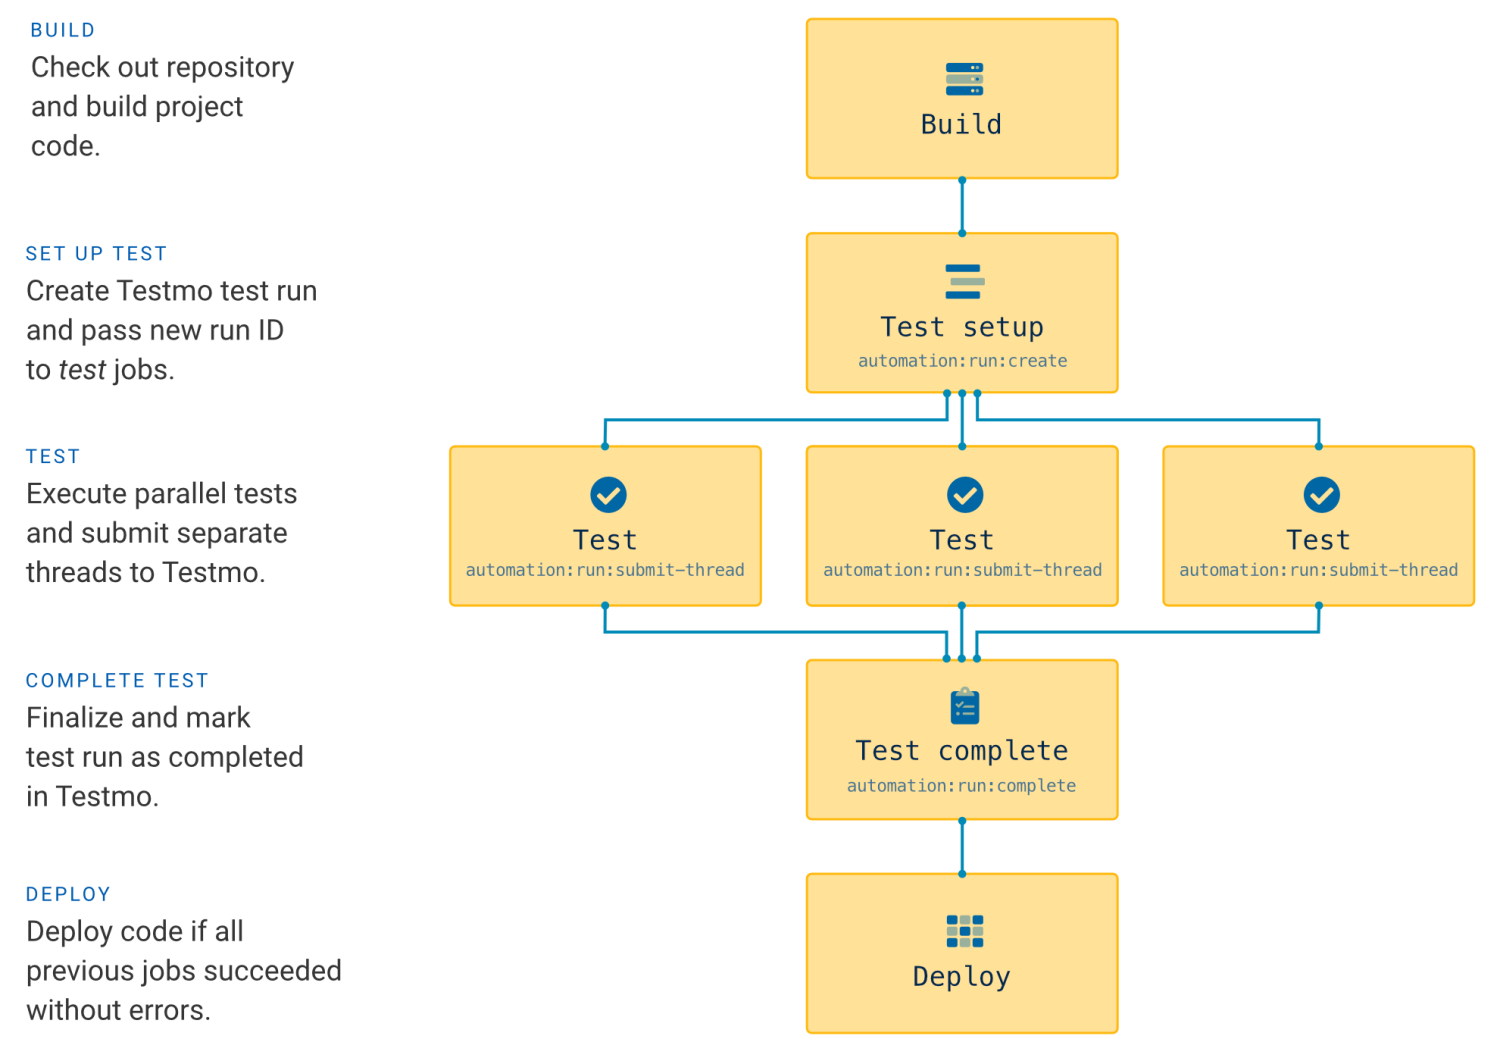
In our example project for this article we are adding separate Build, Test and Deploy steps to our Bitbucket pipeline. Our initial basic pipeline will run our Build step first, followed by multiple parallel Test jobs and then finally run Deploy if all tests in all our testing jobs pass (Bitbucket will not execute the Deploy step if any of our tests fail):

Bitbucket will just run the jobs subsequently one after another in the order we define them in the pipeline configuration. To run multiple jobs in parallel, we just group these steps under the parallel keyword.

In our first example pipeline configuration we start with the Build step, then have four parallel Test steps, and finally end with our Deploy step. For our Test steps we want to reuse the same code for all our parallel instances (in our basic example we just print the string "Testing .." for now). We can reuse the same code by defining it in the definitions section and then referencing it via the *steps directive.

Once we commit the following example pipeline configuration, Bitbucket will run the Build step first, followed by our parallel testing steps, and finally end with the Deploy step:

image: node:19

definitions:
  steps:
    - step: &test
        name: Test
        script:
          - echo "Testing .."

pipelines:
  default:
    - step:
        name: Build
        script:
          - echo "Building .."

    - parallel:
      - step: *test
      - step: *test
      - step: *test
      - step: *test

    - step:
        name: Deploy
        script:
          - echo "Deploying .."

Start Testing with Testmo Free

#1 Unified Modern Test Management Software
Test automation runs
Test automation command line

Example Test Automation Suite

Similar to our previous Bitbucket test automation article, we will use a JavaScript (Node.js) based test automation suite. You can run your automated tests with any other programming language and testing framework the same way and follow this guide.

We will extend our previous example and use multiple separate test files this time, as this makes it easier to run just a subset of our tests in each parallel testing job. Here is what our project file structure looks like:

bitbucket-pipelines.yml

package-lock.json
package.json

tests/test1.js
tests/test2.js
tests/test3.js
tests/test4.js
tests/test5.js
tests/test6.js
tests/test7.js
tests/test8.js

In Bitbucket we are creating a new repository called example-bitbucket-parallel and commit our initial files. Remember to also enable CI pipeline execution from Bitbucket's Pipeline page. Now whenever we commit new code to the repository, Bitbucket will start a new pipeline run and pick up our pipeline configuration. You can always review the full example project for this article and all its files in our repository on Bitbucket.

We are using the Mocha/Chai JavaScript testing framework for this project. Our pipeline will use the official node (Node.js JavaScript runtime) Docker image. If you prefer to use a different language and platform, you can just choose a different testing framework and matching Docker image.

For our example project, each of our test files look similar to the following example. Each file consists of a list of test cases that pass by default:

// tests/test1.js
const chai = require('chai');
const assert = chai.assert;

describe('files', function () {
    describe('export', function () {
        it('should export pdf', function () {
            assert.isTrue(true);
        });

        it('should export html', function () {
            assert.isTrue(true);
        });

        it('should export yml', function () {
            assert.isTrue(true);
        });

        it('should export text', function () {
            assert.isTrue(true);
        });
    });
});

Parallel Test Execution With Bitbucket Pipelines

We are now going to update our pipeline configuration to run our tests in Bitbucket. We already told Bitbucket to run multiple testing jobs and we now need to add the actual test execution.

If we just executed our tests like we did in our previous example article on Bitbucket test automation, it would always run all the tests of our suite in each testing job. Instead, we want to configure things to run just a subset of all tests in each job (and make sure to run all tests exactly once across all jobs).

So how do we know which tests to run in each testing job? Bitbucket sets two environment variables so we know the total number of parallel jobs (in case we change our config in the future), as well as the index of the current job (the variables are called BITBUCKET_PARALLEL_STEP_COUNT and BITBUCKET_PARALLEL_STEP, respectively). With these variables we can identify a subset of tests to run in each job that is consistent across pipeline runs.

We wrote a little script called split.js that implements this. The script uses a simple approach to find all test files and run a different set of files in each job based on the file count. We could extend the script to balance the tests based on test file size, number of tests in the file or even based on past execution times. But for our example project (and many larger projects) this approach works just fine. Here's the full pipeline configuration to run our tests in our parallel test steps now:

# bitbucket-pipelines.yml
image: node:19

definitions:
  caches:
    npm: ~/.npm
  steps:
    - step: &test
        name: Test
        caches:
          - npm
        script:
          - npm ci
          - node split.js | xargs npm run mocha

pipelines:
  default:
    - step:
        name: Build
        script:
          - echo "Building .."

    - parallel:
      - step: *test
      - step: *test
      - step: *test
      - step: *test

    - step:
        name: Deploy
        script:
          - echo "Deploying .."

Once we commit the new configuration to Bitbucket, it will start a new pipeline run and execute our parallel test steps four times in parallel. In each step our split.js script selects a different subset of our test files and passes them to Mocha to run:

Reporting Test Results to Test Management

Running our automated tests in parallel with our Bitbucket CI pipeline is the first step, but we also want to collect and report our test results. We are going to submit all test automation results to a test management tool – Testmo in our case. Sending the test results to Testmo allows us to track and review our test runs, submit new issues to issue tracking tools (such as Jira) and make the test results available to the entire team.

We are running our tests in parallel in Bitbucket, so it would be great to also track our testing jobs separately. Fortunately Testmo has full support for parallel testing by submitting the results for each job as a separate thread. You can then view the test results and metrics for an entire test run at once, or view each thread and its results separately. For each testing job we can also measure the run time, capture the full console output and record the exit code with each thread.

The following screenshot shows the overview of a test run with multiple separate testing jobs in Testmo (note the section with the threads for each testing job at the bottom).

We again use the testmo command line tool to submit the test results (we already looked at this in our previous basic Bitbucket Pipelines test automation guide). We can just use npm again to install the tool and this only requires a single command.

We could just add the install code to our pipeline configuration. But because we will need the testmo tool in multiple steps in our pipeline, it's easier to just save it to our package.json file for all our steps. It is then automatically installed when we run npm ci in our pipeline. Just add the package by running the following command inside your local development container and commit the updated package configuration files to your repository:

# Run this inside your dev container and then 
# commit package.json & package-lock.json to Bitbucket
$ npm install --save-dev @testmo/testmo-cli

In our previous article we just used the basic testmo automation:run:submit command. This creates a new test run in Testmo, adds a single thread, submits all test results to this thread and marks the run as completed – all at once. With our more advanced workflow, we want to submit multiple threads separately and then mark the run as completed after all tests were executed and reported.

So we update our pipeline configuration by adding additional Test setup and Test complete steps. In our new setup job we create the empty test run in Testmo and store the new test run ID and pass it to all subsequent steps. Each Test step submits its test results by using this run ID, and the Test complete step finally marks the run as completed. Here's an illustration explaining our updated approach:

As mentioned, we receive the test run ID of the newly created run in our Test setup step (we also submit all basic information to Testmo in this step, such as the test run name and Testmo project ID). To pass this run ID to our subsequent steps, we can just write this ID to a text file, in our example named testmo-run-id.txt. When we then specify this file in the artifacts section of the pipeline config, Bitbucket stores the file after the Test setup step ends and restores the file in later steps. We can then just load the ID from this file and pass it to other commands.

We previously called our split.js script and passed the test files to Mocha to execute our test suite. To make things a bit easier this time, we are also adding a script alias for this to our package.json. We are also updating the command to generate a JUnit XML file with our results, so we can use this to submit the results to Testmo. You can find the full package.json file along with all repository files in our Bitbucket example repository.

We are also changing our Test step to run the testmo automation:run:submit-thread command and pass our mocha-junit-parallel command to it as the last parameter. The testmo command line tool will then launch our Mocha (subset) test suite, which allows it to capture the console output and measure its execution time. All this is then automatically submitted together with the test results as a new thread of the previously created run.

# bitbucket-pipelines.yml
image: node:19

definitions:
  caches:
    npm: ~/.npm
  steps:
    - step: &test
        name: Test
        caches:
          - npm
        script:
          - npm ci
          - npx testmo automation:run:submit-thread
              --instance "$TESTMO_URL"
              --run-id "$(cat testmo-run-id.txt)"
              --results results/*.xml
              -- npm run mocha-junit-parallel # Note space after --

pipelines:
  default:
	# [ .. ]

    - step:
        name: Test setup
        caches:
          - npm
        script:
          - npm ci

          # Optionally add a couple of fields such as the git hash
		  # and link to the build
          - npx testmo automation:resources:add-field --name git --type string
              --value ${BITBUCKET_COMMIT:0:7} --resources resources.json
          - BUILD_URL="$BITBUCKET_GIT_HTTP_ORIGIN/addon/pipelines/home#!/results/$BITBUCKET_BUILD_NUMBER"
          - npx testmo automation:resources:add-link --name build
              --url $BUILD_URL --resources resources.json

          - npx testmo automation:run:create
              --instance "$TESTMO_URL"
              --project-id 1
              --name "Parallel mocha test run"
              --resources resources.json
              --source "unit-tests" > testmo-run-id.txt
        artifacts:
          - testmo-run-id.txt

    - parallel:
      - step: *test
      - step: *test
      - step: *test
      - step: *test

	# [ .. ]

    - step:
        name: Deploy
        script:
          - echo "Deploying .."

We are then marking the test run as completed in our test-complete step after all testing jobs finished. We will again reference our previous test run ID for this. Testmo will then mark the test run as completed and flag the run as passed or failed based on the test results.

If we miss this step (also see below), Testmo will still complete the test automation run eventually, as it automatically completes automation runs without activity after a configurable timespan.

- step:
        name: Test complete
        caches:
          - npm
        script:
          - npm ci
          - npx testmo automation:run:complete
              --instance "$TESTMO_URL"
              --run-id "$(cat testmo-run-id.txt)"

What about failing tests?

Until now, all our tests always passed. We can update one of our test files to fail. To try this, you can just change one of the test files and raise an error by adding throw new Error('This test failed'); to one of the tests. Will this still get reported to Testmo? And what happens to our Deploy step?

The way our pipeline configuration works is that all test results are still fully submitted to Testmo. By default, the testmo command line tool will pass through the exit code of Mocha. So if Mocha returns an error because a test failed, this is passed through to Bitbucket so it knows the step failed.

Bitbucket will then stop running all subsequent steps, so it will skip the Test complete and Deploy steps. We do not want to deploy our code when some tests fail, so this is the desired behavior. Now, for the Test complete step it would be nice if we had an option to always run it, regardless of previous errors. Many CI tools offer this option, but at the time of this writing, Bitbucket doesn't directly support this. Testmo was designed to handle this correctly though, and automation runs will be marked as completed automatically anyway after some time (this can be configured under Admin > Automation), so everything works as expected.

Tracking Test Suites, Runs & Threads

With our test runs and results now submitted to the testing tool, we can track our test results, review failures, report issues (e.g. with the Jira test management integration), identify slow and flaky tests and use these insights to improve our test suite. This also allows us to easily grant access to and share our test results with the rest of the team.

Using parallel test execution for your automated tests also makes it easier to scale the test suite over time. If your test suite grows, you can simply increase the number of parallel testing jobs. All other aspects of the configured CI pipeline will automatically adjust. So we can always fine tune the number of parallel jobs in the future without changing anything else.

Another reason many testing teams adopt QA tools is that it allows them to track automated testing together with other QA efforts such as manual test case management and exploratory testing. So you can track all these efforts in the same project and link them to the same milestones in one central tool. Tracking automated tests also helps increase awareness of build performance and testing times, thus giving your team a chance to improve these metrics over time.

Following the approach outlined in this article to implement parallel testing with Bitbucket is a great step towards building and maintaining a scalable test automation suite that performs well over the long run, so make sure to try it for your projects.

PS: We regularly publish original software testing & QA research, including free guides, reports and news. To receive our next postings, you can subscribe to updates. You can also follow us on Twitter and Linkedin.

Section divider
More from Testmo
Complete guide to Selenium test automation reporting, metrics and dashboard. Learn how to submit test results, track runs, improve your test suites and identify slow and flaky tests.
Read full article
This is our complete guide on setting up a GitLab CI/CD pipeline for test automation, including reporting of test results to test management.
Read full article
We are introducing new demo projects with sample data for Testmo trial accounts to make it easier to discover and try all of Testmo's features & benefits.
Read full article

Start testing with Testmo for free today

Unified modern test management for your team.